Intermediate | Flow of The Week: How to automate PDF document generation from a DOCX template using Microsoft Flow


How to automate PDF documents generation from a DOCX template using Microsoft Flow
Written by Anton Khritonenkov.
In this article, I will describe how to automate the creation of complex PDF documents from a template. Let us say we have a sales department. They are tired of filling the same documents with brief changes again and again. We could provide them some form for filling data and generate documents automatically.
Microsoft Flow is a glue between different services. It makes it possible to pick a few products that suite your needs and use them together without writing a line of code.
In this article, I will show how to use SharePoint Online, Plumsail Forms, and Plumsail Documents together for satisfying our requirements for the invoicing process.
We will need to create a form, then trigger a flow on form submission, generate an invoice from a template. Then we will save the generated invoice in the SharePoint document library of our sales department. Then the document will be sent by email to a customer.
Create an invoice form
In this article, I used Plumsail Forms for Web, but you can use any other forms solution that has integration with Microsoft Flow and supports tables.
I designed the form as a wizard to simplify the user experience. Below you can see how it looks.

I will not describe here the implementation of the form. You can download the export file and import it on your side. You will get the same form.
Note: While creating your form assign meaningful internal names to the fields, table and table columns. Those internal fields will be a part of data sent to our Microsoft Flow.
This is how you can specify the internal name:

Prepare DOCX template for invoice
I want to use DOCX template instead of HTML or some other format because it gives more control to end user (our sales department). The person without programming skills has to be able to change the template and adjust the styling of the documents.
Click here to download the sample template. This is how it looks:

You can see that there are some tokens like {{data.bulletFullName}}. We will use data from our forms to replace them.
A bit tricky part is a table with products. There is a single row with tokens like {{data.product.quantity}} in the Word table. The template will automatically understand that the “products” is an array and replicate rows for each product item.
I would recommend you to read more about template syntax in the documentation.
Later in the Flow, you will see the JSON object that is applied to the template. Understanding the structure of this object will help you to create the correct template.
When the template is ready we can save it somewhere in SharePoint. Let us say we saved it in the document library of our sales department site.
Create Microsoft Flow for invoice generation
Now we need to create a Flow that will receive data from the form submission and apply it to the template that we prepared.
Here is how our Flow looks:

Let us review it step by step.
Flow trigger
Flow is triggered when the form is submitted. You need to put form ID into the trigger to enable this. Review this instruction for more information.

Getting DOCX template
We use “Get file content” action from SharePoint connector to get the DOCX template from the SharePoint document library where we saved it earlier.

Initialize invoice number
We use the “Initialize variable” action to generate an invoice ID. Put this expression into the variable. It represents the current date formatted as “yyMMdd”. You can use any other approach for numbering. I just like this one.

formatDateTime(utcNow(), ‘yyMMdd’)
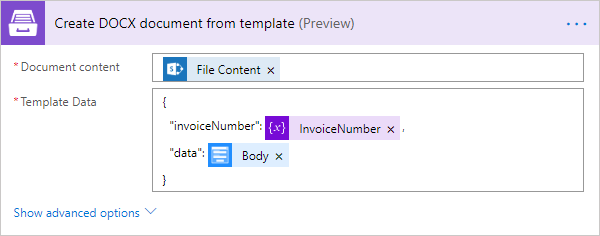
Apply our DOCX template
The action uses Create DOCX document from template action. You just put the DOCX template into “Document content” property. Then specify the JSON object as on the picture below. The JSON object is applied to our DOCX template. There are two fields in this object:
- invoiceNumber — variable from the previous step.
- data — data from the Plumsail Forms trigger. The “Body” represents all data received from the form.

Convert generated DOCX document to PDF
You just need to put the output from the previous action to Convert DOCX to PDF action:

Save result PDF into SharePoint and send email
Then in the last to actions, we save the result PDF file in SharePoint for future reference and send it by email to our customer.
The “billedEmail” is taken from the form submission trigger.

Conclusion
Microsoft Flow allows us to automate a lot of things and integrate various services. One of the common cases is document management automation. I hope this article will help you to save your time and time of your colleagues. Spend time for more valuable tasks than filling out some papers again and again. I think it worth it to spend some time on automation and then delegate it to Microsoft Flow.
Please leave comments and questions below and be sure to Follow Anton on Twitter!