Advanced | Flow of the Week: Automating Microsoft Flow Governance – Using Microsoft Flow


Introduction
Enterprise Security and Governance is an important topic for many organizations. Microsoft continues to make investments that allow customers to implement PowerApps and Flow and be confident that they have their bases covered from a governance perspective. Much like Microsoft Flow empowers users to build powerful workflow and automation solutions, we want to empower administrators with the same capabilities to support their needs. In this blog post we are going to explore a scenario that describes how you can automate governance activities by taking advantage of the Office 365 Management API.
Overview
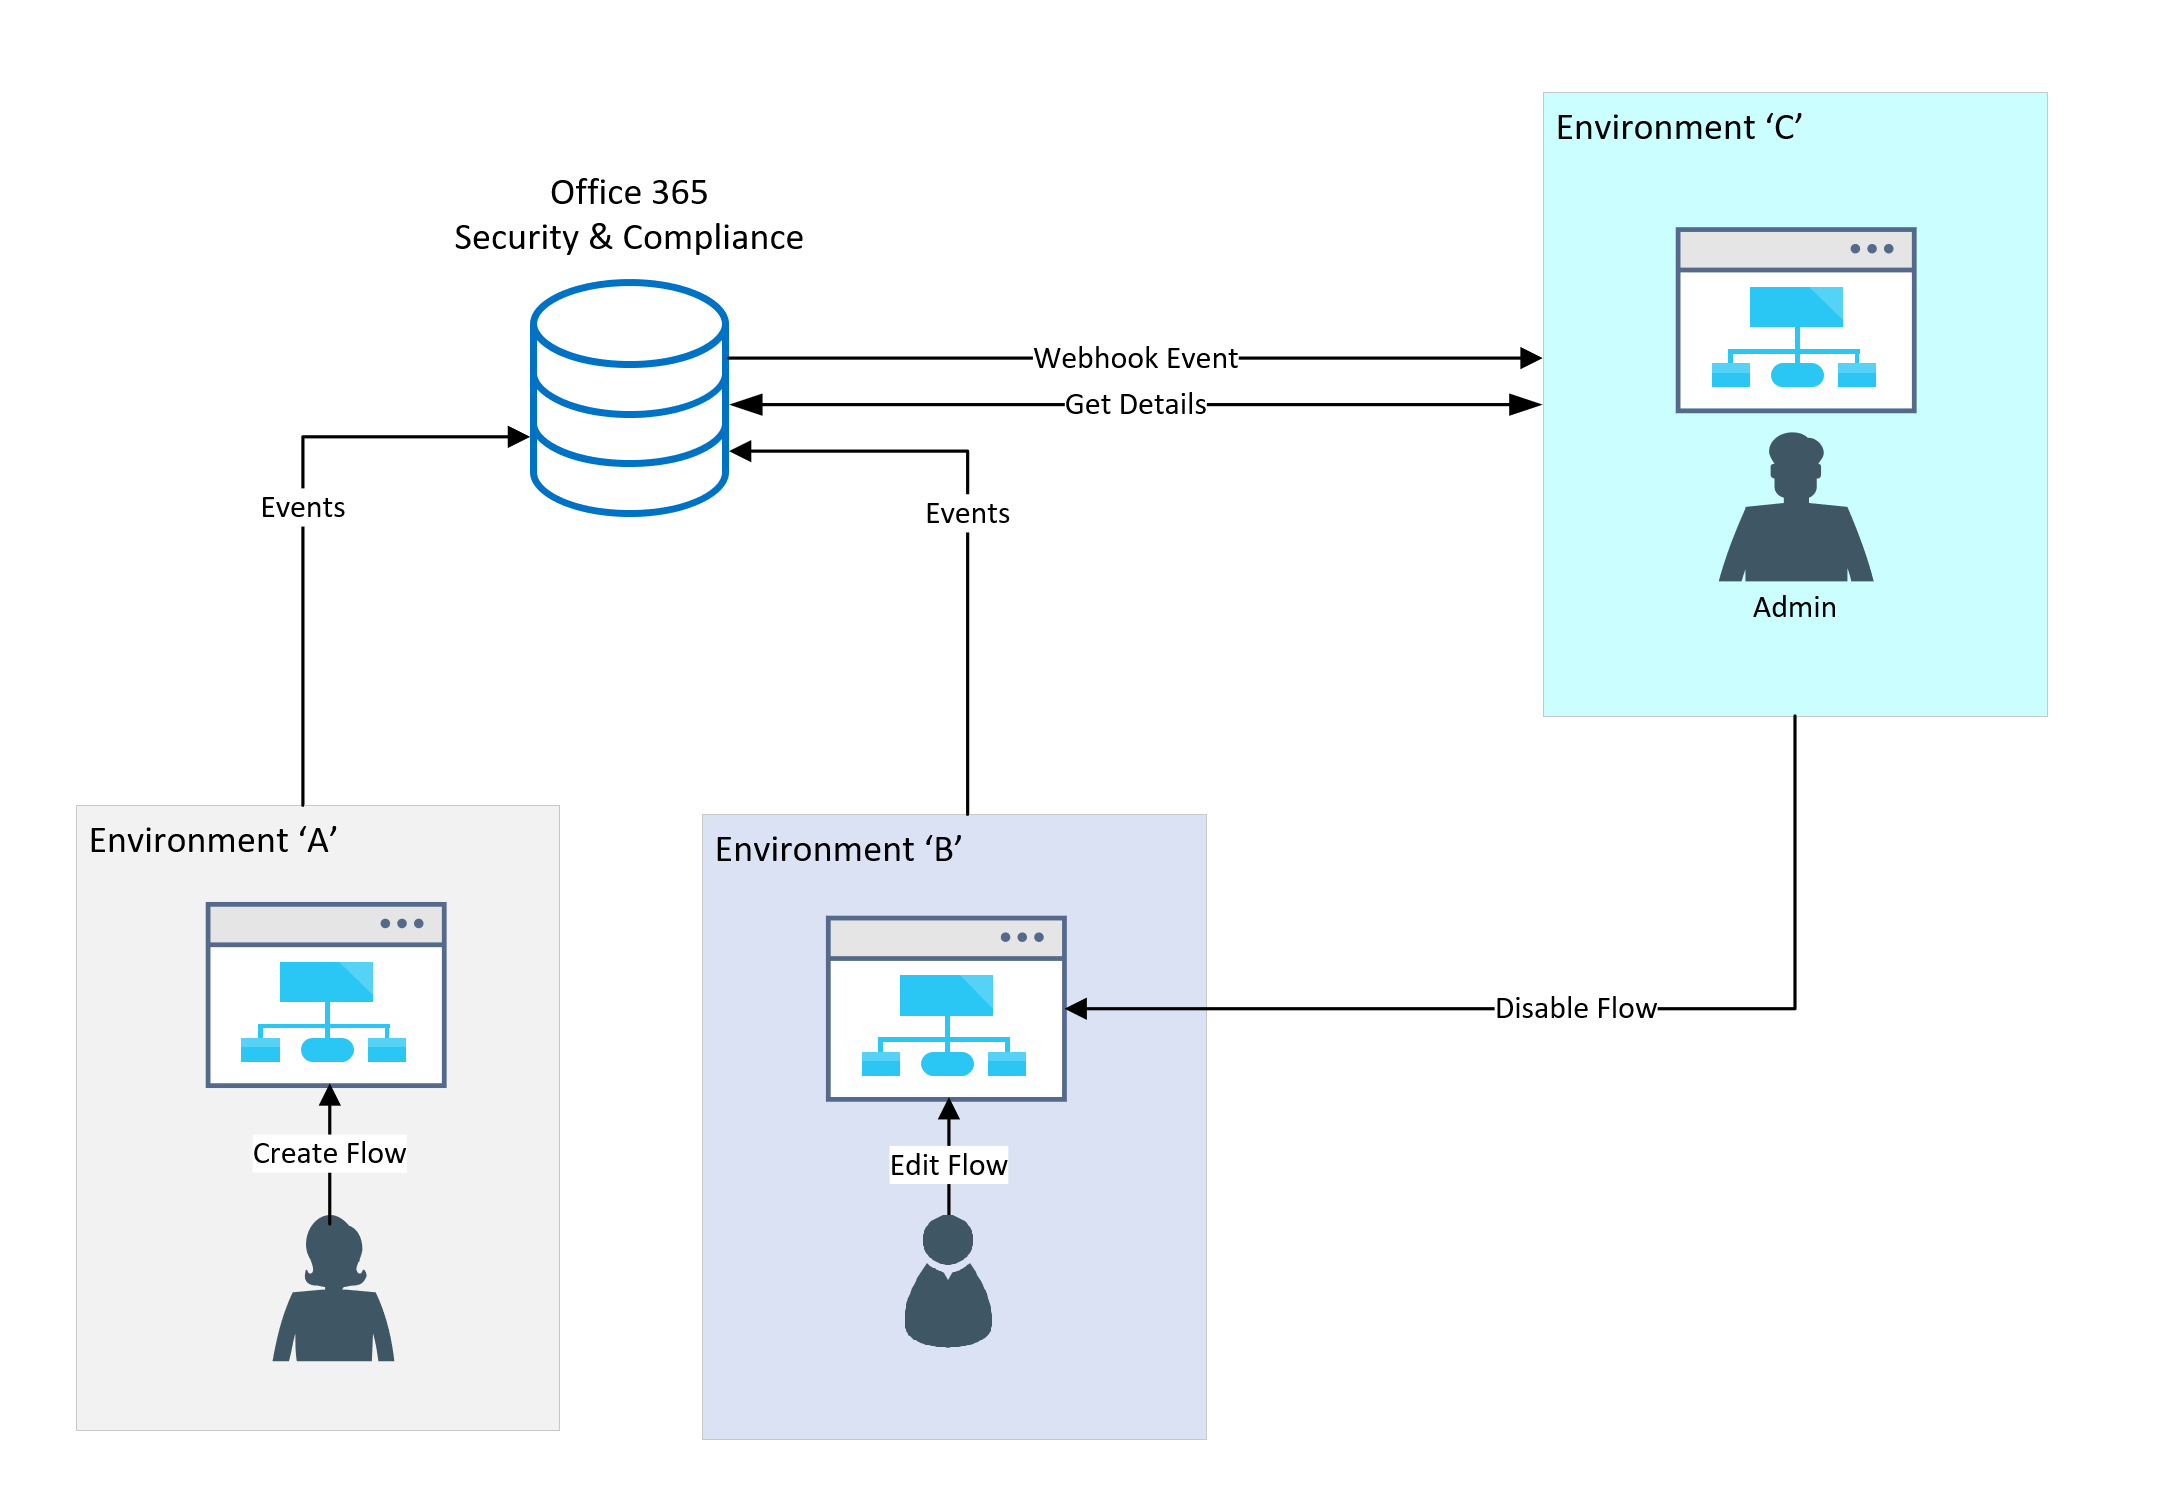
A scenario that we will walk through in this post is the ability to detect when specific events exist within a flow definition so that we can detect these events and provide pro-active governance against it. For example, some organizations would like to avoid users forwarding emails externally. Microsoft Exchange can block these scenarios through transport rules. But, using cloud workflow tools (including more than just Flow) you generally break down these actions into more discrete events. For example, I can receive an email and send an email within the same flow. Independently, these actions may not be perceived as forwarding an email, but from a functional perspective, they achieve the same result.
In order to detect these events, we will depend upon the Office 365 Security and Compliance logs which will capture events related to creating, editing or deleting a flow. In a previous blog post, we discussed how we can poll the Office 365 Security and Compliance PowerShell Webservice looking for these events. In this blog post, we are going to use an event-driven approach where we will create a webhook and have events sent to a Microsoft Flow endpoint. Once Microsoft Flow receives this event, we will go fetch additional details of the event. We will then parse these events and perform some logic to determine if a condition exists that warrants action, including stopping the flow that is a concern.
Pre-requisites
In this blogpost, we will be interacting with the Office 365 Management API and the Microsoft Flow Management connector. As a result, there are specific requirements for accessing these capabilities:
| Office 365 Management API |
|
| Flow Management Connector |
|
Azure AD Application
The first thing that we need to do is create an Azure AD Application that we will use when calling the Office 365 Management API. For this blog post we are going to try to focus on the Microsoft Flow components as much as possible. For additional information on the Office 365 Management API, please see the following post.
To create an Azure AD Application:
- Navigate to the Azure Portal
- Select Azure Active Directory and then App registrations
- Create a New application registration
- Provide a Name for your application, Application type of Web app/API and a Sign-on URL.
Note: The Sign-on URL is an arbitrary value. You can even put a value of http://localhost
- Once the application has been created, you can click on Settings to further configure.
- Click on Properties and make a note of the Application ID as you will require it in a future step.
- While on the Properties screen, ensure the Multi-tenanted option is set to Yes.
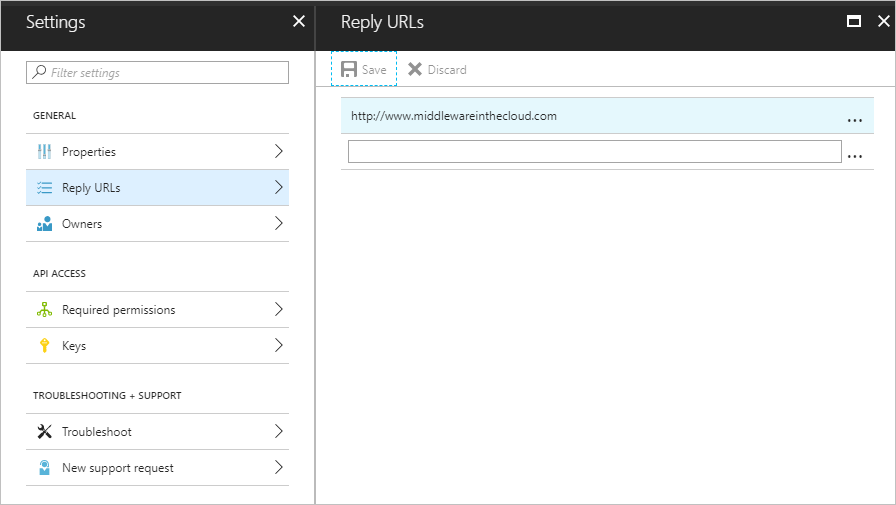
- Click on Reply URLs and add a value. For this value you can provide an arbitrary URL, but having it resolve will simplify an upcoming step. For my example, I just used my blog http://www.middlewareinthecloud.com
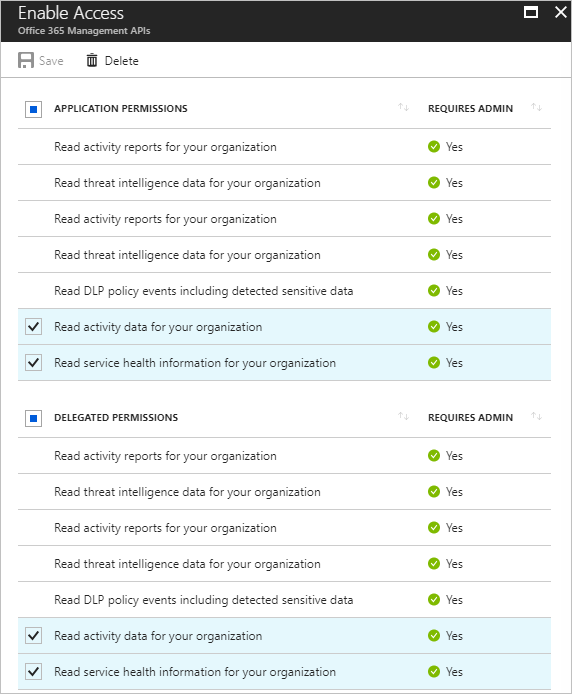
- Next, click on Required permissions
- Click on Add – Select an API – Office 365 Management API
- Next, set the permissions as illustrated below.
- We now need to need to obtain a Key which can be achieved by clicking on Keys.
- Provide a Description, Duration and click Save. Once you have done this, a Key Value will be generated. Copy this value for future use.
- Save and exit.
Note: If your key contains special characters like '/' and '+', you will get an invalid key error when you try to create a token in a subsequent step. These values need to be encoded and any online URL encoding website should be able to encode these values for you.
Get Office 365 tenant admin consent
In the Office 365 documentation, it calls out “a tenant admin must explicitly grant your application these permissions in order to access their tenant's data by using the APIs”. As a result, a tenant admin must call the following URL in order to grant consent. In addition, the URL will return an authorization code that we will need in a future call.
Within this URL, there are two placeholders that we need to populate with information from our Azure AD application. When it comes to “{your_client_id}” this is referring to the Application ID that we recorded when creating our Azure AD application. The “{your_redirect_url}” placeholder refers to the Reply URL that we also provided when creating the Azure Ad application.
- With our URL formulated, we can use a web browser to make this call. Upon successfully calling this URL, you will be prompted with a consent dialog.
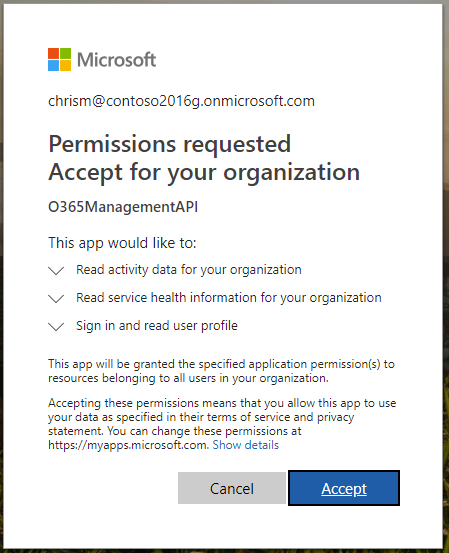
- Upon Accepting the terms, your Reply URL web page should be displayed.
Create Microsoft Flow Listener
With our Azure AD App created and consent granted to use the Office 365 Management API we are now going to create our webhook subscription within Office 365. But, before we do that we need to be able to provide a URL that can be called whenever there are events published from the O365 Management API. We will now create our flow and then we can use the URL that is provided as part of our HTTP trigger when configuring our webhook subscription.
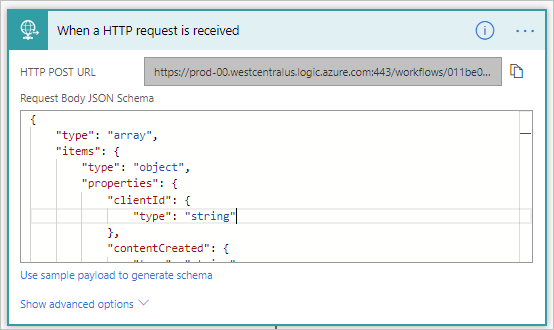
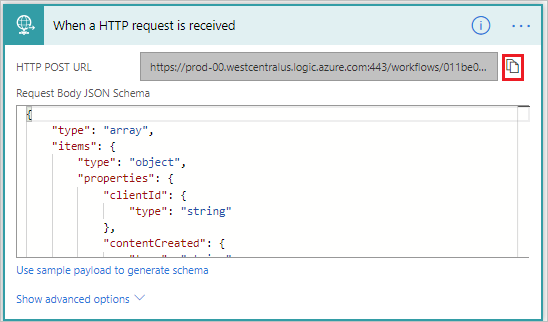
- Create a Flow from blank and add an HTTP Trigger
- Since we want a typed message that we can be used within our flow, we can provide a JSON Schema payload of an event we can expect to receive from the O365 Security and Compliance Center.
{
    "type": "array",
    "items": {
        "type": "object",
        "properties": {
            "clientId": {
                "type": "string"
            },
            "contentCreated": {
                "type": "string"
            },
            "contentExpiration": {
                "type": "string"
            },
            "contentId": {
                "type": "string"
            },
            "contentType": {
                "type": "string"
            },
            "contentUri": {
                "type": "string"
            },
            "tenantId": {
                "type": "string"
            }
        },
        "required": [
            "clientId",
            "contentCreated",
            "contentExpiration",
            "contentId",
            "contentType",
            "contentUri",
            "tenantId"
        ]
    }
}
- Next, we will add 3 Compose actions where we will store our values for client id, client key and tenant. For both client id and client key you should have these values from when you created your Azure AD application. Your tenant id can be retrieved by following one of these approaches.
Note: We chose to use Compose actions instead of variables as there is less of a performance hit and these are values that we will not need to further manipulate.
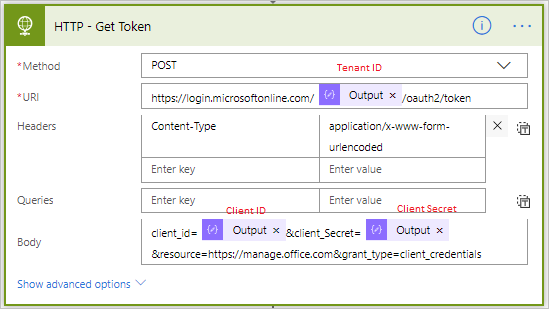
- Our next step is to retrieve an auth token that we can use to retrieve event details from the O365 Security and Compliance Center. We will use the values that we captured in our Compose actions and construct a URI that includes our Tenant ID. Our Header will include a Content-Type of application/x-www-form-urlencoded. Lastly, we need to provide key/value pairs that include our Client ID, Client Secret, Resource and Grant Type.
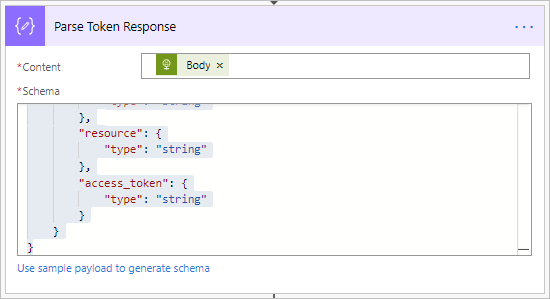
- We need to use the token that is returned in downstream actions so we will add a Parse JSON action that can will use this HTTP response as an input. The following Schema can be used to give our response a message shape.
{
 "type": "object",
 "properties": {
  "token_type": {
   "type": "string"
  },
  "expires_in": {
   "type": "string"
  },
  "ext_expires_in": {
   "type": "string"
  },
  "expires_on": {
   "type": "string"
  },
  "not_before": {
   "type": "string"
  },
  "resource": {
   "type": "string"
  },
  "access_token": {
   "type": "string"
  }
 }
}
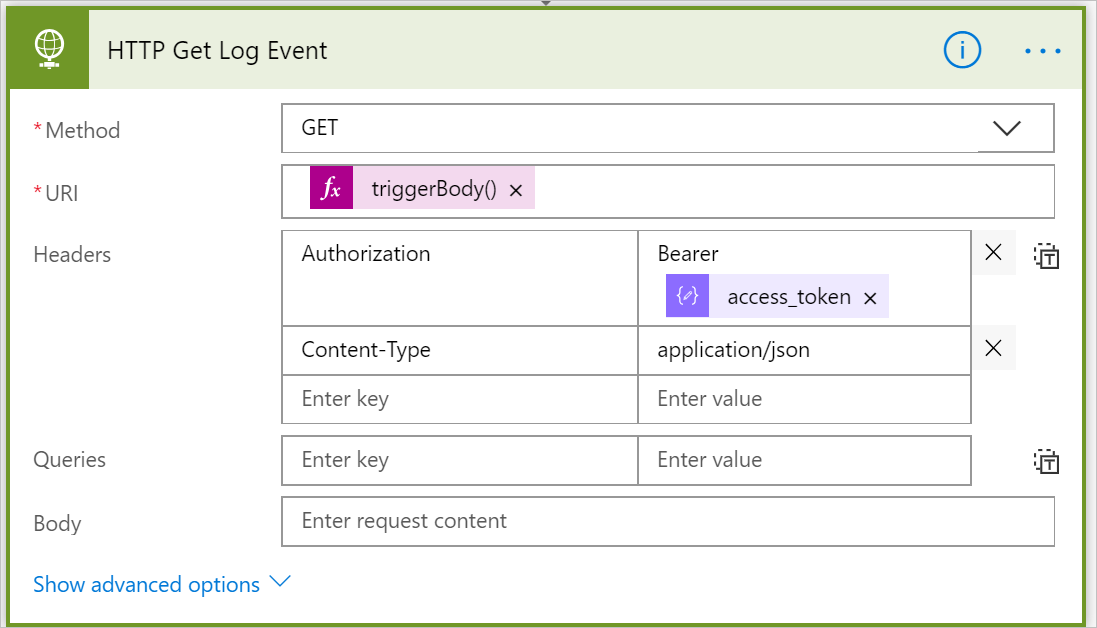
- Our HTTP Trigger will only provide us with a message that describes the event that occurred inside the Office 365 Security and Compliance Center. It won’t provide us with actual details about the event. To get the actual details about the event we need to make a subsequent call to the Office 365 Management API to get the details. We will accomplish this by using the HTTP Action and performing a GET request to the URI that was provided as part of the inbound message. The expression that we can use to retrieve this value is triggerBody()[0]?['contentUri']. We also need to provide an Authorization Header that includes a Bearer token that is retrieved from our previous Parse Token Response action. In addition, we need to specify a Content-Type of application/json.
- We now need to parse our response from the Office 365 Management API so we can explore the results. Once again we will use the Parse JSON action and this time we will provide the following schema:
{
 "type": "array",
 "items": {
  "type": "object",
  "properties": {
   "CreationTime": {
    "type": "string"
   },
   "Id": {
    "type": "string"
   },
   "Operation": {
    "type": "string"
   },
   "OrganizationId": {
    "type": "string"
   },
   "RecordType": {
    "type": "integer"
   },
   "ResultStatus": {
    "type": "string"
   },
   "UserKey": {
    "type": "string"
   },
   "UserType": {
    "type": "integer"
   },
   "Version": {
    "type": "integer"
   },
   "Workload": {
    "type": "string"
   },
   "ObjectId": {
    "type": "string"
   },
   "UserId": {
    "type": "string"
   },
   "FlowConnectorNames": {
    "type": "string"
   },
   "FlowDetailsUrl": {
    "type": "string"
   },
   "LicenseDisplayName": {
    "type": "string"
   },
   "RecipientUPN": {
    "type": "string"
   },
   "SharingPermission": {
    "type": "integer"
   },
   "UserTypeInitiated": {
    "type": "integer"
   },
   "UserUPN": {
    "type": "string"
   }
  },
  "required": [
   "CreationTime",
   "Id",
   "Operation",
   "OrganizationId",
   "RecordType",
   "ResultStatus",
   "UserKey",
   "UserType",
   "Version",
   "Workload",
   "ObjectId",
   "UserId",
   "FlowConnectorNames",
   "FlowDetailsUrl",
   "LicenseDisplayName",
   "RecipientUPN",
   "SharingPermission",
   "UserTypeInitiated",
   "UserUPN"
  ]
 }
}

- The Parse Log Event can retrieve multiple events from Office 365. As a result, we need to loop through the Body that is returned from the Parse Log Event. This loop will get added as soon as we use a data element from the Parse Log Event output.
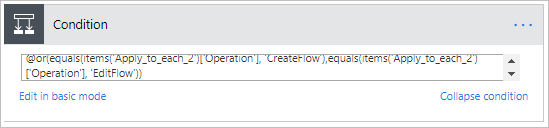
- Since Microsoft Flow events are captured within Audit.General Content Type inside of Office 365 Security and Compliance Center, will now want to perform some logic that will focus on Microsoft Flow CreateFlow and EditFlow events. To accomplish this, we will add an advanced condition that includes an or statement that looks for either CreateFlow or EditFlow events.
@or(equals(items('Apply_to_each_2')['Operation'], 'CreateFlow'),equals(items('Apply_to_each_2')['Operation'], 'EditFlow'))
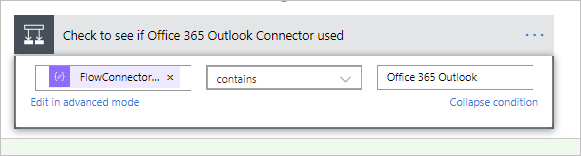
- Next, we want to see if the Office 365 Outlook Connector is being used within this Flow that created the audit event. We can achieve this by seeing if the FlowConnectorNames attribute (within the Parse Log Event) contains Office 365 Outlook.
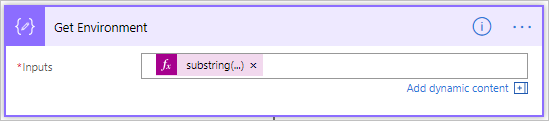
- If the list of connectors does include the Office 365 Outlook connector then we want to further explore whether the Forward Email action is being used since that is the action that we want to prevent our users from using. In order to determine if a Flow Definition does contain the ForwardEmail action we need to capture the Environment ID and Flow ID. To get the Environment ID we will use a Compose Action and use an expression to parse it from the FlowDetailsUrl attribute that can be found within Parse Log Event – Body array. The expression we want to use is:
substring(replace(item()?['FlowDetailsUrl'],'https://admin.flow.microsoft.com/environments/',''),0,indexOf(replace(item()?['FlowDetailsUrl'],'https://admin.flow.microsoft.com/environments/',''),'/'))
- We will use a similar approach to retrieve the Flow ID, but our expression will be:
replace(substring(item()?['FlowDetailsUrl'],lastIndexOf(item()?['FlowDetailsUrl'],'/'),sub(length(item()?['FlowDetailsUrl']),lastIndexOf(item()?['FlowDetailsUrl'],'/'))),'/','')

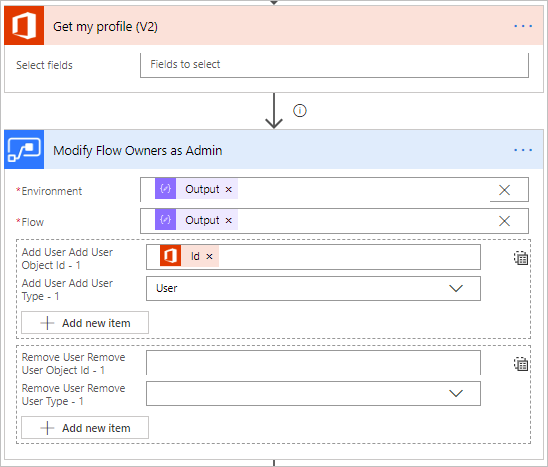
- In an upcoming step, we want to add our Principle Id as an owner of this flow that we want to inspect so that we can retrieve the flow definition. To obtain our Principle ID we can use the Office 365 Users connector and the Get my profile (V2) action to provide this attribute.
- We can use the Id returned from the Get my profile (V2) action with our outputs from the Get Environment and Get Flow ID compose actions to add our account as an owner of this flow.
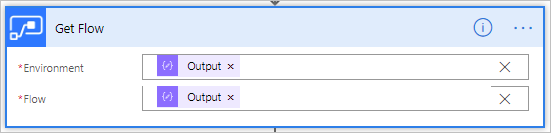
- Being an owner of the flow is important so that we can retrieve the flow definition to determine whether or not the Forward Email action is being used. We can retrieve the flow definition by using the Flow Management connector and using the Get Flow action. Once again we need to use the outputs from the Get Environment and Get Flow ID compose actions as inputs to this action.
- We are going to inspect the flow definition for a swaggerOperationId that is equal to ForwardEmail but before we do that we need to cast the json flow definition to a string. We can do this by using the following expression: string(body('Get_Flow')['properties']['definition']). Once we have it cast, we can see if it contains "swaggerOperationId":"ForwardEmail".

- If the flow definition does include the ForwardEmail action then we want to perform some additional steps in the If yes branch.
- As you have seen, the Environment ID is an attribute that we have used within this flow. But, we have not used the Environment Name, since it isn’t a data attribute that is available to us at this point. However, we can access this attribute by using the List My Environments action that is part of the Flow Management connector.

- By calling the List My Environments action, all of the environments that our user has access to will be returned. Since we cannot filter using the existing connector, we can add a Filter array action and filter on the Environment Name attribute by comparing it to the Environment ID that we have previously captured.
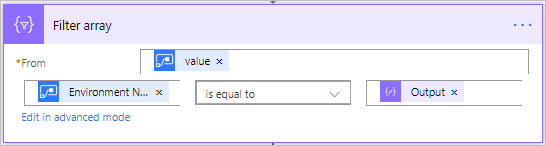
- Since the Filter array action will return a list of items that match our criteria, we will want to access the first instance using an expression body('Filter_array')[0]?['properties']?['displayName'] which will take the first index of our array. Since Environment IDs are unique, this approach is safe.
- With our Environment Display Name now available, we can pass this attribute and others into an approval that we will use to determine whether or not any corrective action is required. In addition, we will include the Flow Display Name, Environment ID, User UPN (from Parse Log Event) and Connectors Used (from Parse Log Event).
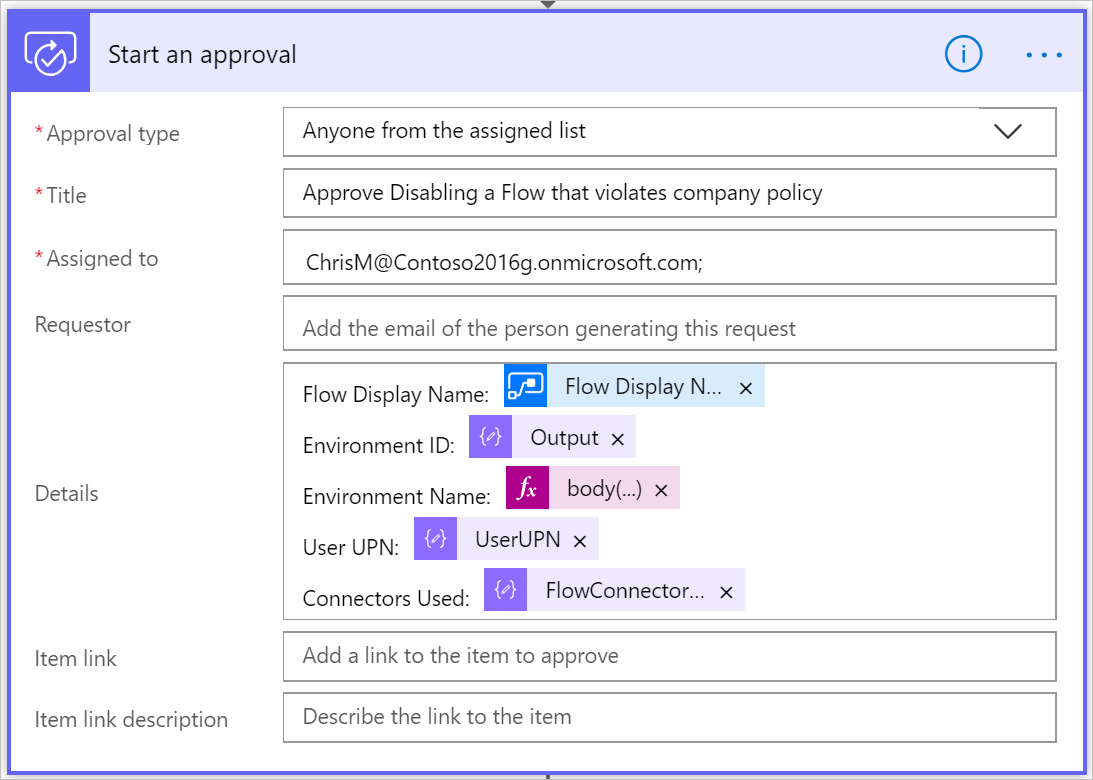
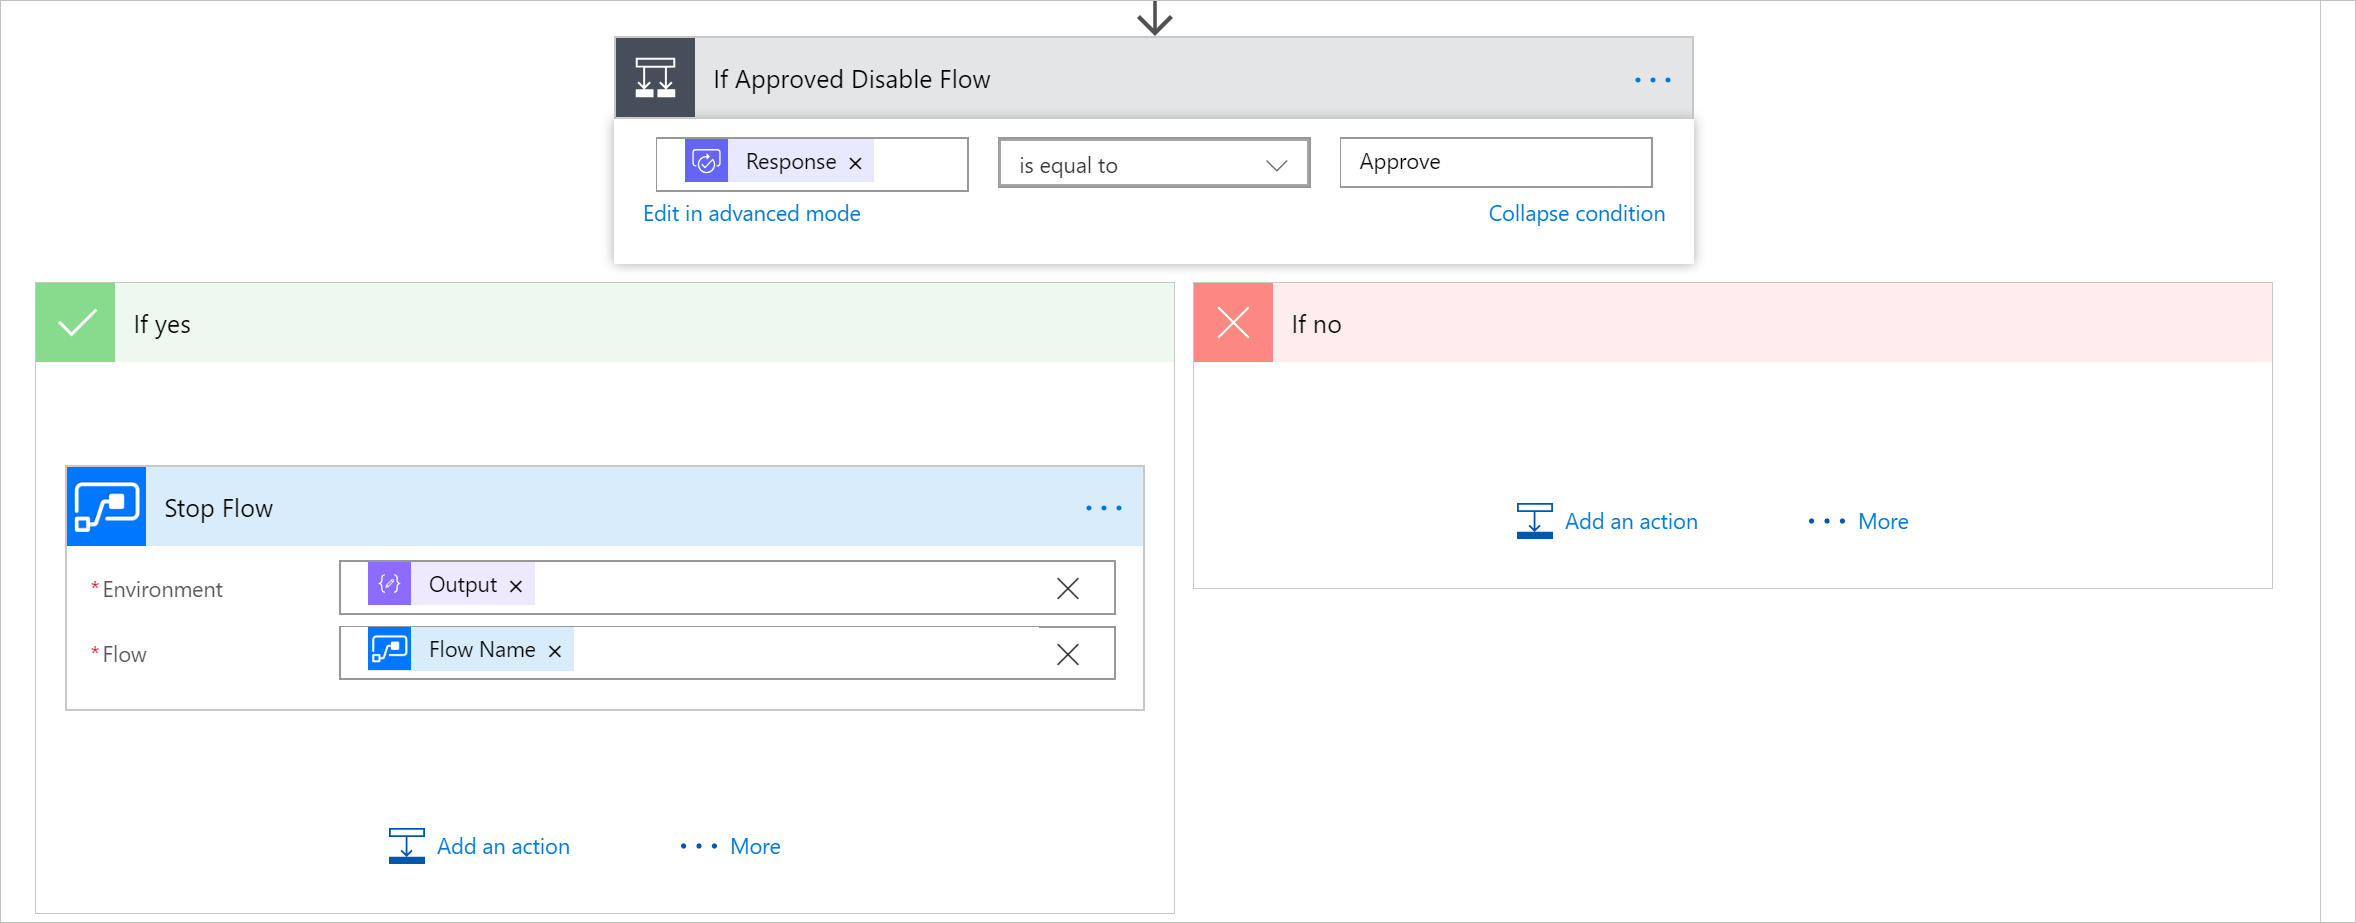
- Next, we will wait for an approval by adding a condition to our flow. Provided the Response is equal to Approve we will use the Stop Flow action that is part of the Flow Management connector to stop that flow.
To view the entire flow, please click on the following link.
Creating Office 365 Management API Webhook
With our flow now complete, there is something that we need to do before we create our Webhook subscription. We need the URL that is part of our HTTP Request Trigger which we can copy by clicking on the following icon.
To complete the next couple steps we are going to need to call the Office 365 Management APIs and as a result will benefit from a tool called Postman.
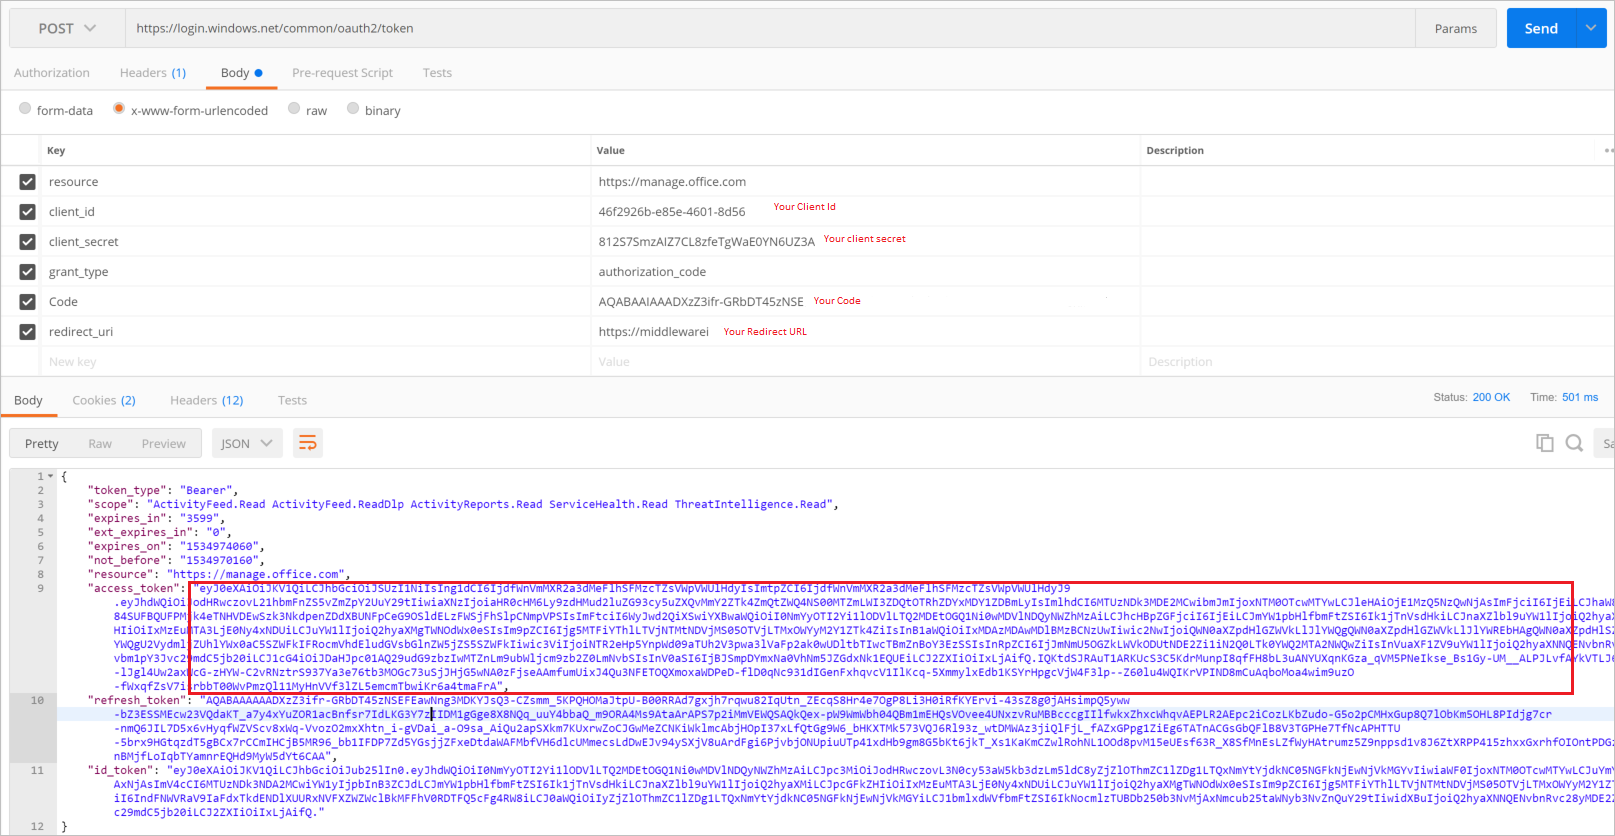
We need to generate an access token that we can use to create our Webhook subscription. To do this, we need access to our Code that is returned from our consent call.
- To obtain this code populate client_id and redirect_uri with your values and enter this into a web browser.
- When the webpage resolves, there will be a query parameter called code returned in the URL. Copy this value for use in the next step.

Note: At the end of the URL returned from the web browser, there may be a session_state query parameter also returned. This value is not required and should not be included in the next step.
- We now need to construct an HTTP request that we will send to https://login.windows.net/common/oauth2/token that looks like the following image that will provide us with an access_token that we will use when creating our webhook. As part of this request we will need to provide data from our Azure AD application that we previously created including client_id, client_secret and our redirect_uri. In addition to these values, we also need to include a resource of https://manage.office.com, a grant_type of authorization_code and our code from our previous step.
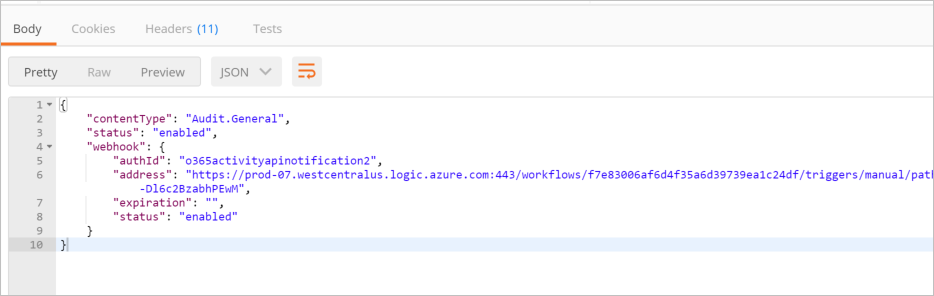
- Next up is creating our Webhook subscription. To do this we will need to copy out the access_token from our response. Inside of Postman, open a new tab and construct a new POST request to https://manage.office.com/api/v1.0/{your_tenant_id}/activity/feed/subscriptions/start?contentType=Audit.General
Note: We are including a query parameter of contentType that has a value of Audit.General. As mentioned previously, the flow events show up under this content type.
The Headers that we need to include are Authorization that has a value of Bearer <access_token>. Recall this is the access_token from our previous step. We also want to provide a Content-Type of applicatiion/json.

We aren’t quite done yet. We also need to provide a Body where we will include our Flow Request URL and a value for authId.
{
 "webhook" : {
  "address": "Enter your Flow Request URL here",
  "authId": "Enter an arbitrary value here",
  "expiration": ""
 }
}
- When we submit this request, we can expect to receive a response like the one below which indicates that our webhook has been created successfully.
Testing
We are now ready to test!!! To test our new governance process, we will sign into Microsoft Flow with a different user account. We will subsequently create a new flow the includes an Outlook Trigger and has a Forward Email action.
- Upon saving this flow, an event will be raised within the Office 365 Security & Compliance Center within approximately 20 minutes and our webhook subscription will be invoked.
- We should now have an approval waiting for us.
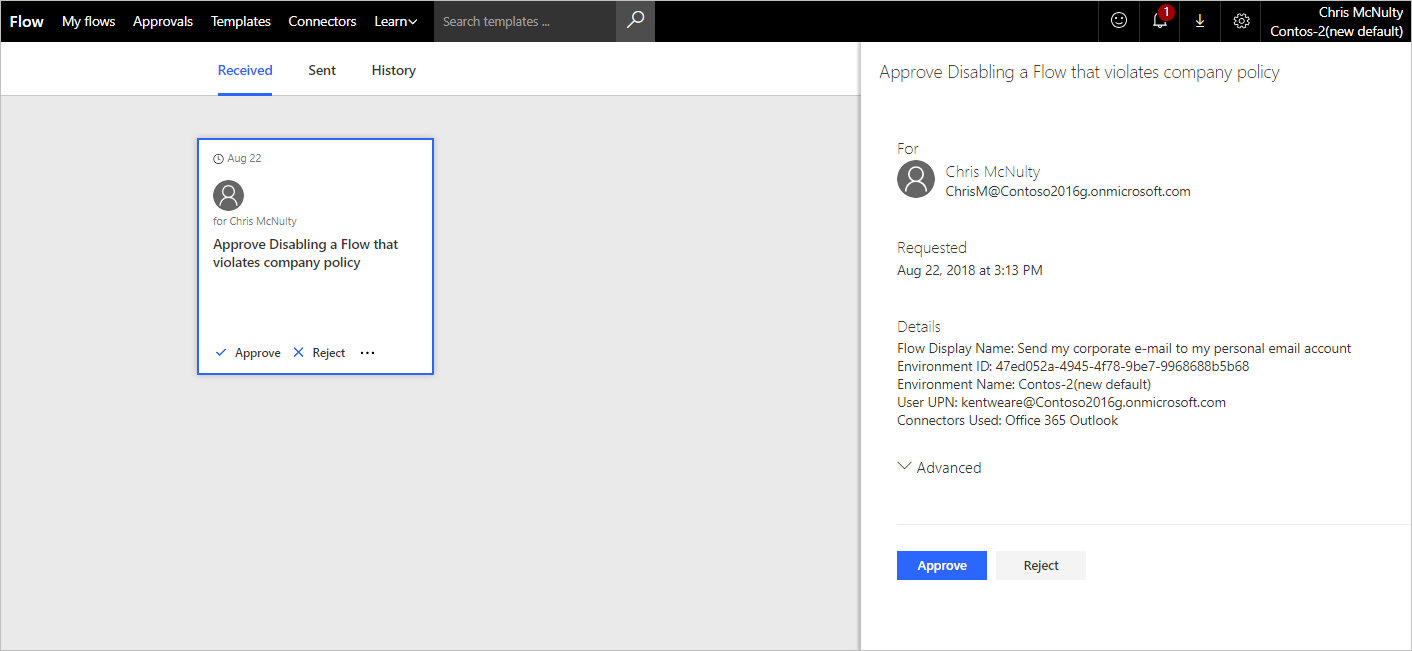
- We will go ahead and approve this request. When we do, we will see that this flow has been stopped from further processing.

Conclusion
In this blog post we explored some powerful capabilities that exist within the Office 365 Management APIs and the Flow Management Connector. Using the combination of these two platforms allows for a customized governance experience. This allows organizations to build governance solutions on top of what Microsoft already provides out of the box.
In addition to the scenario that we just built, this solution can be extended to support other scenarios that you want to govern, including other connectors or actions that you want to restrict.
Other Considerations
- In this post we described how to receive events from the Office 365 Security and Compliance Center using a webhook approach. There are also options to use a polling approach like we covered in a previous blog post.
- We only covered one scenario where we parsed our flow definition. If you wanted to build a more comprehensive parsing solution, you can build an Azure Function and pass the flow definition into the function where your logic is executed.