Integrating a Custom API with Flow


Today, I wanted to share the experience I went through while integrating the Web API for Microsoft’s Application analytics platform as a CustomAPI into PowerApps and Flow, and briefly walk through how to upload a Custom API to PowerApps.
Custom API’s
Custom API’s are simply any RESTful API that you can integrate with our service.
The two things required for a Custom API are:
- A Well-Documented Swagger/Specification that conforms to the OpenAPI standard.
- An Icon that represents the service
The most important of the two being…

For those who are not familiar with what a Swagger is, it’s a very well documented Specification that defines the structure for how a service can be discovered and its capabilities understood. More information, a Web Editor, and examples of Swaggers from companies like Spotify, Uber, Slack, and Rackspace can be found at Swagger.io.
The main things to note regarding integration with Microsoft Flow: The Swagger can be written in JSON or YAML, but Microsoft Flow and PowerApps requires a JSON file. Conveniently, the Swagger Web Editor allows you to download a Swagger as YAML or JSON. Personally, it was much easier for me to use YAML and download it as JSON.
A section labeled securityDefinitions needs to be included in the Swagger.
Some modifications using Microsoft specific Swagger extensions may be necessary to fully integrate a Custom API with Flow.
A more in-depth guide to creating and registering a custom API with PowerApps can be found in this Custom API Tutorial, as well as more specifics about how to Customize your Swagger definition for PowerApps and Flow
Creating a Custom API for Application analytics 
Application analytics is a relatively new service that Microsoft publicized, although it’s been used for a while internally at Microsoft. It is a “Disruptive Technology for Log Search and Analytics”.
I was tasked with creating a “connector” for it (Adding a Custom API, and Integrating it with PowerApps and Flow). This originally detailed writing a Swagger for it and grabbing an icon off of a Power Point. The objective of adding this API is deceivingly simple: we just wanted to allow users to be able to include a Query to the backend in one of their flows. That is, a flow should just be able to query given a cluster name, database name, and query string and receive tabular results.
The first iteration was trivial to produce:
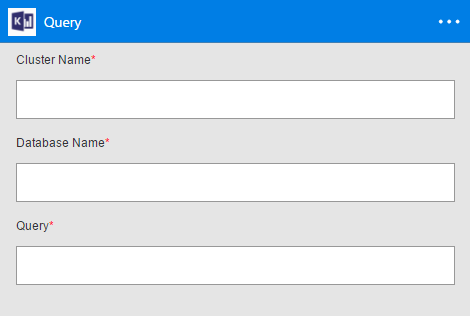
The Swagger contained all the necessary information including the security definitions (AAD in this case), a single well-defined “POST” call, and explicit definitions for the request object to the backend as well as the response object (JSON Objects in this case).
This looked great and returned the correct results…

but unfortunately the Flow designer could not inherently create the reference boxes that make it extremely simple for an end user to reference data from a previous card like so:
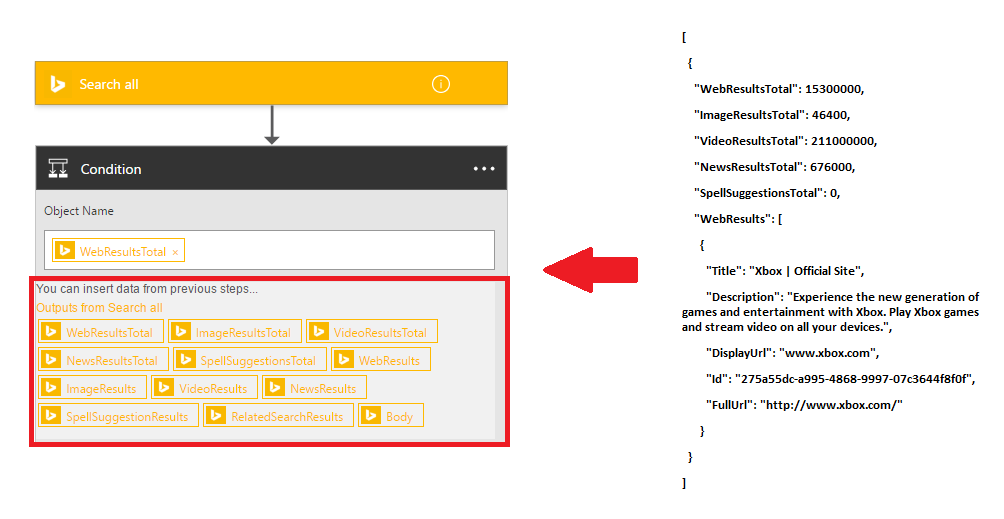
The main problem is the response from the query. The response object is a “table” derived from a specific query; It’s impossible to know the number and names of the columns that will be in the table, or the type of information each column is represented by until the query is actually executed. This means the Table is dynamic in nature. My first implementation although functional was completely useless to an end-user unless they have clairvoyance and l33t webdev skills.
It was to inconvenient to use, which defeats the objective of Flow when we want people to “Work less, do more”.
Luckily, the team had encountered this issue while integrating services like SQL Server, Excel, Sharepoint. The team developed a Swagger Extension: “x-ms-dynamic-schema”. This extension allows a definition in the Swagger to have the property “x-ms-dynamic-schema” which also entails referencing a function that will dynamically populate the schema. Now while editing a Flow if this custom API is used, the Flow Designer should recognize that there is dynamic schema definition and call the function attached to the definition. This allows Flow to get the schema during editing a flow instead of running a flow and allows the reference boxes to be populated in later condition or action cards.
This is a nice solution to the problem of dynamic schema, but I encountered interesting obstacles on this endeavor of implementing x-ms-dynamic-schema into the Swagger… The first problem was the fact that there is currently a small bug where the Flow Designer will only recognize a dynamic schema call if the referenced function is a GET method (this actively being fixed). Too bad the HttpRequest needs to have a JSON body that includes the database name and query string, because the internet gets angry you if a GET request has a body.
To compound the problem, the response object from the backend is a “non-standard, efficient, and compact JSON representation”
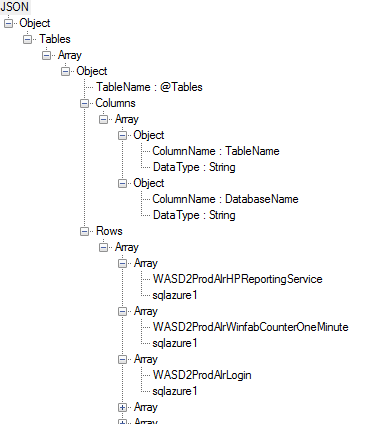
It’s pretty much impossible for the Flow Designer to navigate and understand the schema of this object by itself, and I can’t internally extend or modify the Web API. I now have a request problem and a response problem.
I explained this depressing realization to a teammate.
His response: “It’s too far gone… it’s not worth it… you are too deep down the rabbit hole. No one has ever done this before.”
My response:
(•_•)
( •_•)>⌐■-■
(⌐■_■)
“That’s why it’s going to work.”
(or at least that’s how it played out in my head…)
The Solution: Azure Functions

Azure Functions are this cool new app service on Azure that basically allows you to easily setup serverless code that can get triggered by different things. It’s quite magical.
In this case, I was going to leverage an Azure function to act as a mediator between Flow and the backend. With this I am able to modularly address each problem.
Request
For simplicity, I made sure to name the function to match the relative paths I defined in the Swagger. The host/base path in the Swagger was also modified to point to my new Azure function and I added code in the Azure Function to essentially “forward” the request to the backend. Below is some templated code I made for creating a mediator Azure Function:
public static async Task<HttpResponseMessage> Run(HttpRequestMessage req, TraceWriter log)
{
    log.Info($"C# HTTP trigger function processed a request. RequestUri={req.RequestUri}");
    // extract necessary info from request
    AuthenticationHeaderValue auth = req.Headers.Authorization;
    // forward new response to custom API and maniuplate API response before sending back to Flow
    HttpResponseMessage apiResponse = await ForwardRequest(auth, hostUri, log).ConfigureAwait(false);
    String result = await Response.Content.ReadAsStringAsync();
    //send Response back to original request (Flow)
    return req.CreateResponse(HttpStatusCode.OK, result);
}

// constructs a httprequestmessage to send to Application analytics with the Query
// change parameters to fit what you need to add/forward request to new hostUri

private static async Task<HttpResponseMessage> ForwardRequest (AuthenticationHeaderValue auth, string hostUri, TraceWriter log){
    // A new httprequest is used to get a response from the API
    using(var request = new HttpRequestMessage(HttpMethod.Post, hostUri)){
        // populating headers of the new httprequestmessage from function parameters
        request.Headers.Authorization = auth;
        // You can use other Content Classes to add things beside a string
        request.Content = new StringContent("REQUEST BODY HERE" , Encoding.UTF8, "application/json");

        // Send off request to new hostUri and await response
        using (var handler = new WebRequestHandler())
        {
            using (var client = new HttpClient(handler))
            {
                return await client.SendAsync(query).ConfigureAwait(false);
            }
        }
    }
}
This means I can send whatever I want from Flow to the Azure function and then in the Azure function modify whatever I need to and build a new request to Application analytics with the correct parameters. This circumvents the GET problem as I ended up breaking up the JSON object properties in to strings and stashing them in the Http Request Query then, in the Azure Function, rebuilding the JSON object in the body of a new Request to the backend.
Now, Flow is able to talk to the Azure Function and the function talks to the backend.
Response
There is still the response object problem from before. The response object the backend sends back to the Azure Function then to Flow is still exactly the same and as useless as ever.
To solve this, the JSON.net C# framework was particularly helpful. When the Azure function receives the response from Application analytics, I parse the content of the response as a string into a JObject and then manipulate JTokens to simplify the original JSON into something more digestible by Flow. The complexity with this logic came from the fact that Flow needs to be able to get the Schema during editing and the actual Data during run time. With this, two Azure functions were necessary. One to derive a schema of a consolidated, simplified JSON object representing the Table, and one to actually create that consolidated, simplified JSON object. Creating a JSON object that represented the schema of another JSON object using JSON.net was very reminiscent of inception (It didn’t help that there exists a “JSON Schema.net” I could not use as it requires a license the team doesn’t have).
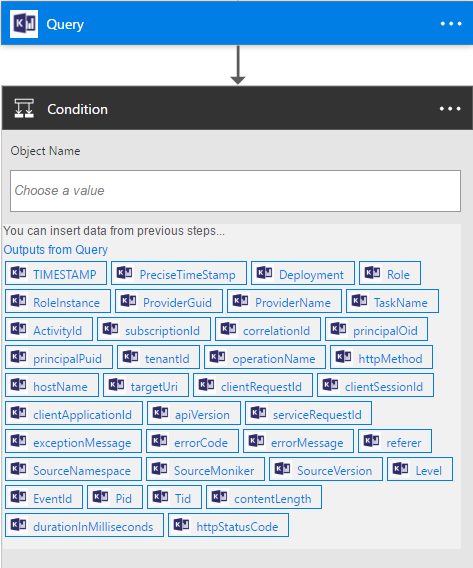
Finally, after I finished modifications to the JSON schema and object, Flow was able to understand the JSON and populate those glorious reference boxes!
Conclusion
With completion of the JSON modifications, the Application Analytics Custom API now worked perfectly with Microsoft Flow. Having the reference boxes is a world of difference and was worth it for the result of making using Application analytics queries in a Flow extremely easy and powerful! Creating the implementation for the Application analytics Web API helped form a great foundation using Azure Functions for extending and controlling a service without directly modifying it. The experience provided a great discovery and learning opportunity and resulted in a well-received addition to Flow.
Uploading a Custom API
Once you have a complete Swagger (and have an Icon to accompany it) you can then upload it to PowerApps by doing the following:
- Navigate to the Connections page in the PowerApps web portal and then click on New Connection in the top right:

- Then from the New Connections page click Custom on the upper left side and the page should change to look like the one below:
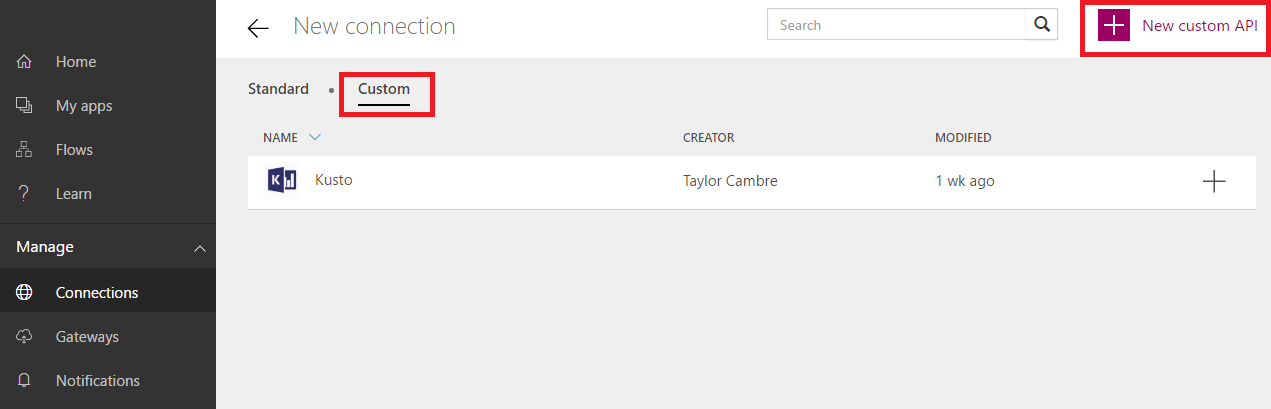
- Finally, click the + New Custom API button in the top right.
- Now upload and fill out the required information that resembles below:
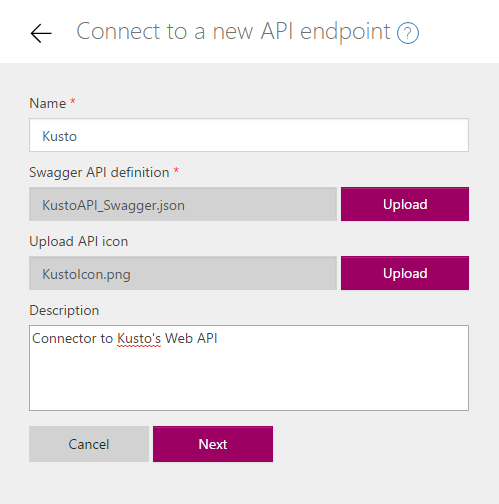
- Hit Next, then another box will pop up if you specified Authentication in your Swagger. Fill out the required information and then hit save.
Note: If you need to change the Swagger of your Custom API or Icon, a new Custom API will need to be created in PowerApps. We are actively working on allowing users to edit their existing Custom APIs
Now your Custom API has been uploaded and you’ll be able to search for it when creating or editing a Flow and use it!