By Industry – Human Resources: Onboarding made easy
In this post, we’ll walk through a new hire onboarding scenario. We’ll use Flow to manage new hire information in Excel and SharePoint, then send emails to department heads when their employees are ready to start. Along the way we’ll use some cool features in Flow, including: running a flow on a schedule; applying an action to each row in an Excel file; testing for multiple conditions in our data; and using a switch case statement to control who we send email to.
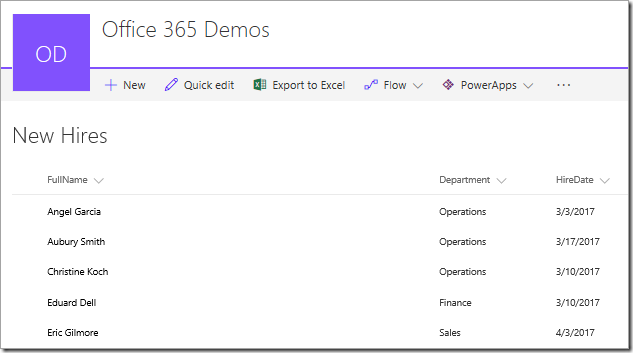
Reviewing data in Excel and SharePoint Online
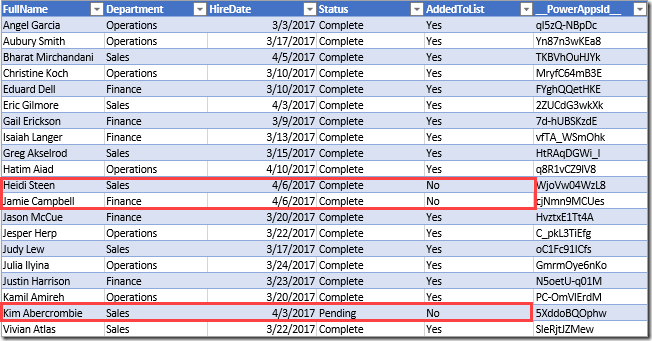
In this scenario, Bill (one of our HR reps) likes to track everything in Excel, but other folks like to use SharePoint Online. Flow keeps everyone happy! Bill can maintain his Excel file, and Flow ensures that the right information is periodically added to a SharePoint list. The following table shows Bill's data in the New Hires Excel file. You can copy this data if you want to follow along.
| FullName | Department | HireDate | Status | AddedToList |
| Angel Garcia | Operations | 3/3/2017 | Complete | Yes |
| Aubury Smith | Operations | 3/17/2017 | Complete | Yes |
| Bharat Mirchandani | Sales | 4/5/2017 | Complete | Yes |
| Christine Koch | Operations | 3/10/2017 | Complete | Yes |
| Eduard Dell | Finance | 3/10/2017 | Complete | Yes |
| Eric Gilmore | Sales | 4/3/2017 | Complete | Yes |
| Gail Erickson | Finance | 3/9/2017 | Complete | Yes |
| Isaiah Langer | Finance | 3/13/2017 | Complete | Yes |
| Greg Akselrod | Sales | 3/15/2017 | Complete | Yes |
| Hatim Aiad | Operations | 4/10/2017 | Complete | Yes |
| Heidi Steen | Sales | 4/6/2017 | Complete | No |
| Jamie Campbell | Finance | 4/6/2017 | Complete | No |
| Jason McCue | Finance | 3/20/2017 | Complete | Yes |
| Jesper Herp | Operations | 3/22/2017 | Complete | Yes |
| Judy Lew | Sales | 3/17/2017 | Complete | Yes |
| Julia Ilyina | Operations | 3/24/2017 | Complete | Yes |
| Justin Harrison | Finance | 3/23/2017 | Complete | Yes |
| Kamil Amireh | Operations | 3/20/2017 | Complete | Yes |
| Kim Abercrombie | Sales | 4/3/2017 | Pending | No |
| Vivian Atlas | Sales | 3/22/2017 | Complete | Yes |
The New Hires list has the same data for name, department, and hire date. We don't include the other two columns here because in this scenario Flow uses those columns to determine which rows to copy to the SharePoint list.

Building the Flow
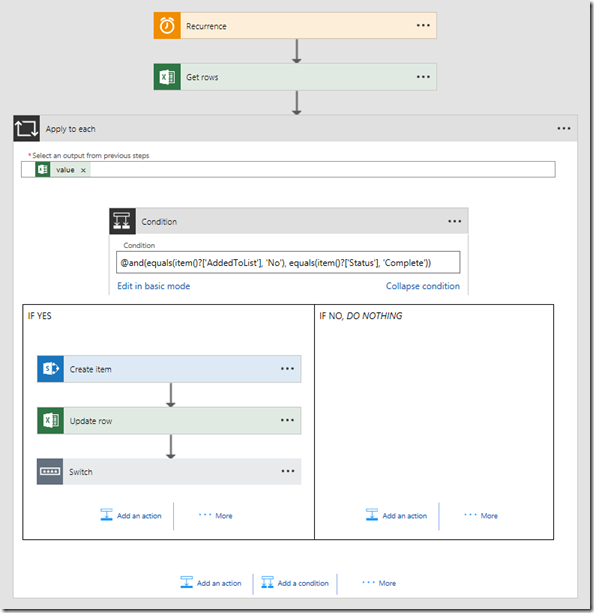
We'll look at each step in more detail shortly, but here's the gist of what we're building:
1. Every hour, read all the rows in the Excel table.
2. Check for rows where the status is complete, and the row hasn't been added to the SharePoint list already.
3. For each row that meets the conditions above:
a. Add a row to the SharePoint list.
b. Update a tracking field in Excel.
c. Send an email based on the new employee's department.
Now that we've seen the data and an overview of the steps, let's build the flow. If you haven't built a flow from scratch before, you can check out Create a flow in Microsoft Flow first.
1. At https://flow.microsoft.com, click My Flows, then Create from blank.
2. Add the Schedule – Recurrence trigger, then set the recurrence to one hour.
![clip_image001[7] clip_image001[7]](https://pwrbiblogimages.blob.core.windows.net:443/media/PowerBI/jessica/mb2.png)
Flow has actions for Excel but not triggers, so we use a recurrence trigger to check our Excel file every hour.
3. Add a new step, using the Excel – Get rows action. Select the Excel file from One Drive, then select the appropriate table.
![clip_image002[6] clip_image002[6]](https://pwrbiblogimages.blob.core.windows.net:443/media/PowerBI/jessica/mb3.png)
4. Add a new step, using the apply to each loop (under . . . More). Select value from the Excel dynamic content. Flow will loop through all the rows in the table and check the condition that we'll define next.
![clip_image003[5] clip_image003[5]](https://pwrbiblogimages.blob.core.windows.net:443/media/PowerBI/jessica/mb4.png)
5. Add a new step, using condition. By default, you can test for one condition in basic mode.
![clip_image004[5] clip_image004[5]](https://pwrbiblogimages.blob.core.windows.net:443/media/PowerBI/jessica/mb5.png)
6. Click Edit in advanced mode, then enter the following formula: @and(equals(item()?['AddedToList'], 'No'), equals(item()?['Status'], 'Complete')).
![clip_image005[5] clip_image005[5]](https://pwrbiblogimages.blob.core.windows.net:443/media/PowerBI/jessica/mb6.png)
This condition ensures we only continue to process rows where the status is complete, and the row hasn't been added to the SharePoint list already. The condition block should look like the following.
![clip_image006[5] clip_image006[5]](https://pwrbiblogimages.blob.core.windows.net:443/media/PowerBI/jessica/mb7.png)
Now we'll add steps for the case where the condition is met. If the condition isn't met, there's nothing more to do.
7. In the Yes branch of the condition, add a new step, using the SharePoint – Create item action. Select the SharePoint site, then select the appropriate list. Use the Excel dynamic content to populate the fields of the list.
![clip_image007[4] clip_image007[4]](https://pwrbiblogimages.blob.core.windows.net:443/media/PowerBI/jessica/mb8.png)
8. Add a new step, using the Excel – Update row action. Use the Row id from the Excel dynamic content to identify the row to update, and set the AddedToList field to "Yes".
![clip_image008[4] clip_image008[4]](https://pwrbiblogimages.blob.core.windows.net:443/media/PowerBI/jessica/mb9.png)
9. Add a new step, using switch case (under . . . More). Flow will look at the value of the Department field for each row that satisfies the earlier condition. It will then perform a different action based on which department the new employee belongs to.
![clip_image009[4] clip_image009[4]](https://pwrbiblogimages.blob.core.windows.net:443/media/PowerBI/jessica/mb10.png)
10. Create a case for each department (Finance, Operations, and Sales). Click ( + ) to add cases. The default case handles any values that aren't specified in a case, for example if someone includes a department not usually tracked in the Excel file or list.
![clip_image011[4] clip_image011[4]](https://pwrbiblogimages.blob.core.windows.net:443/media/PowerBI/jessica/mb11.png)
11. For each case, add a new step, using the Office 365 Outlook – Send an email action. The following images show all four cases, each with a slightly different email sent to a different department head.
![clip_image013[4] clip_image013[4]](https://pwrbiblogimages.blob.core.windows.net:443/media/PowerBI/jessica/mb12.png)
![clip_image015[4] clip_image015[4]](https://pwrbiblogimages.blob.core.windows.net:443/media/PowerBI/jessica/mb13.png)
This is a fairly simple example with different emails, but you could add all sorts of interesting actions as part of each case. The completed flow should look like the following image.

Now that the flow is complete, let's run it and see what happens. The flow is set up to run hourly, but we will trigger it directly, so we can see the results.
Running the Flow
1. Before you run the flow, look at rows 12, 13, and 20 in the Excel file. You see that they all have a value of "No" for AddedToList, but only rows 12 and 13 have a value of "Complete" for Status.

These rows satisfy the condition in the flow, so they should be copied to the list; then an email should be sent for each.
2. In My Flows, click the ellipsis (. . .) for the new hire flow, then click Run now and Run flow.

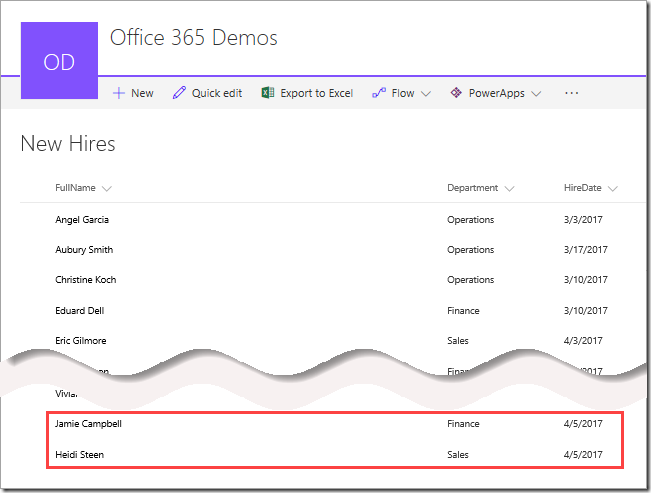
3. Look at the last two items in the list; they correspond to rows 12 and 13 in the Excel file. Success on this step!

4. Finally, look at the email that the flow sent; following is the email sent to Allan DeYoung in Finance, with a new hire notice for Jamie Campbell. It's sent from Megan Bowen, becasue she created the flow.

The flow sends a second mail to Alex Wilber in Sales, with information about Heidi Steen.
That brings us to the end of this scenario – we hope you learned something about handling new hire scenarios, and how to incorporate features like apply to each, switch case, and testing for multiple conditions. Please leave comments below with feedback, and let us know if there are other scenarios you would like us to cover.


