Beginner | Flow of the Week : Automate Onboarding Communications with Flow!


Hello Flow Fans!
Today’s post is written by Michelle Gilbert (former MVP, now Microsoft Teams Technical Specialist) and Melanie Hohertz, MVP Community Superstar!
Onboarding is a painful experience at many organizations. Managers are busy, and welcoming a new hire can fall through the cracks. Thinking about onboarding communication as a business solution means workflows, updates, and notifications galore. But the good news is that you can swoop to the rescue with a smart use of Flow.
The solution below has been tested and verified. It uses Flow, SharePoint and Outlook in ways that do not require admin rights. But we also include an optional, “bonus” Flow that would require “send as” email permissions.
We’ll follow these steps:
Step 1: Outline Your Audiences, Cadence, Messages and Senders
Step 2: Create a SharePoint List to House the Communication Timeframe
Step 3: Build the Flows
Step 4: Create an Input Form with SharePoint
Step 5: Manage Your Flows
Are you ready for automated onboarding communications goodness? Here we go, step by step!

Step 1: Outline Your Audiences, Cadence, Messages and Senders
This business solution will send messages in a pre-set, timed sequence to three different audiences. First is the requestor of the cascade, which may be an admin assistant or manager. Second is the hiring manager, who will receive notices to prepare for the employee’s arrival, and more. Third is the new hire, who should be welcomed, provided resources and prompted for questions and feedback.
Also, while our example below includes timing assumptions such as communications two weeks before start date, on start date, etc., you will want to think through what cadence will best serve your business and colleagues. Thinking about what information should be pushed at particular times leads to drafting your message content.
Last but not least, we had fun thinking through our senders. In our fourth, “bonus” flow, we walk through the steps to send a welcome communication to a new hire from their dynamically generated, geographically appropriate regional leader.
Our solution manages these audiences in four Flows, all pulling data from one SharePoint list to achieve the tasks. This architecture makes use of various SharePoint and Flow features, but of course there are many other possible configurations.
Step 2: Create a SharePoint List to House the Communication Timeframe
First things first! Every time you read “SP list” below, your brain should fill in “SharePoint Online modern list.” Ready?
We created a custom SP list with a column that tracks “hire status” as a trigger for our Flows. The list also stores and serves the new hire’s first and last name, email, region and regional leader options, manager, start date, and the timeframes for our communications to deliver.

As you can see above, many of the columns are simple single line of text, and date and time. We also used person fields, which is a look-up of our organization’s employee directory (Active Directory). Then there are choice fields where we create drown-down options for region and hire status. Last, we used some complex calculated columns, such as for our communication dates and our regional leader. Don’t worry – we will give you those calculations!
Let’s take a look at the columns and their settings, in the order shown above. Note that we made some fields required, as those will trigger our Flows and fuel our calculated columns. These fields will be populated by people filling out the SP input form we create in Step 4.
Ready to start list creation?
- Rename your list’s Title field to First Name. (This field is required by default. By the way, column names are very important to making the dynamic content work in these Flows, so follow the recipe.)
- Create a single line of text column. Name it Last Name, and checkmark to make it required.
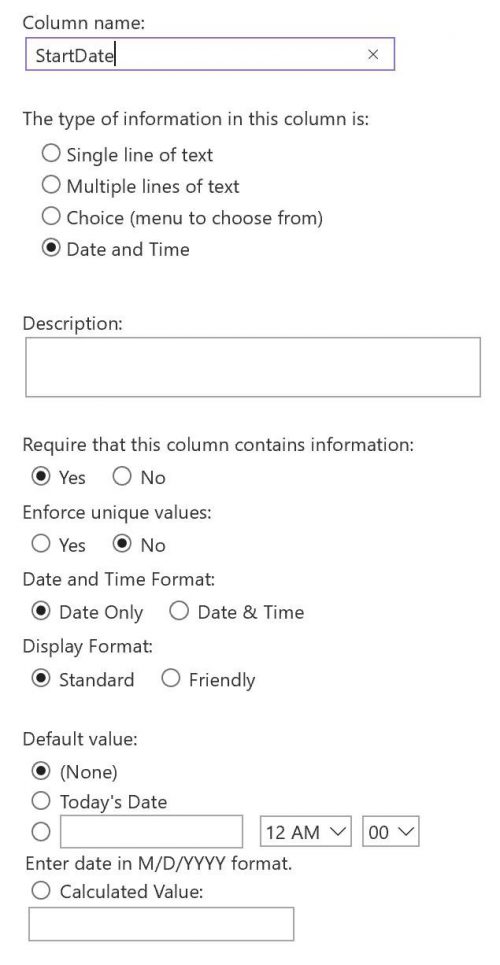
- Create a Date and Time column. Name it Start Date, and follow the configuration below.
- Create a Person or Group column. Name it Manager, and follow the configuration below.
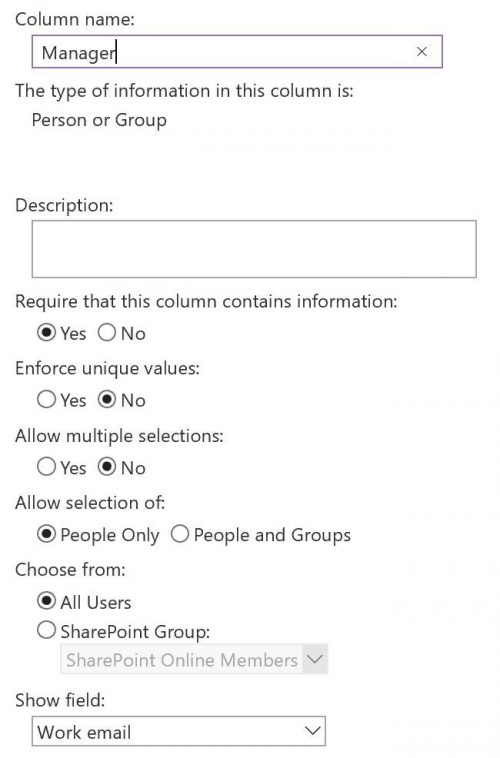
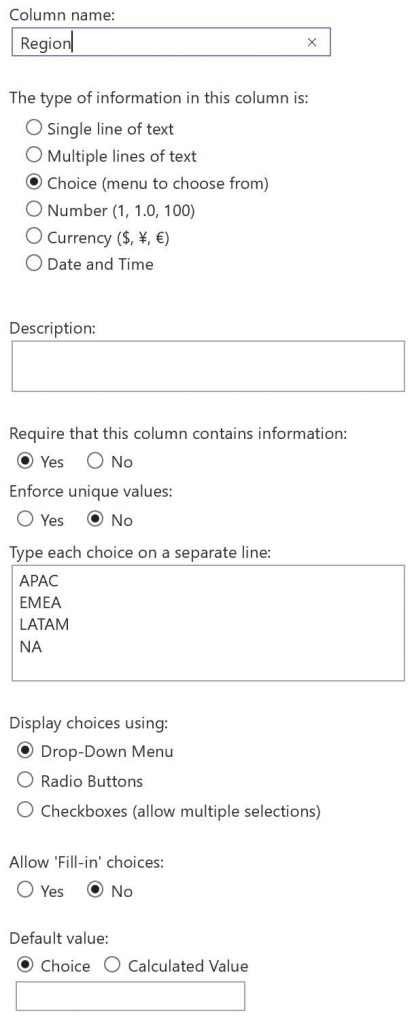
Note that in the Manager field shown above, we’ve allowed selection of “People Only,” and we’re showing the work field email. Add the following two columns if you would like to have emails sent to your new hire based on geography and regional leaders. - Create a Choice column. Name it Region, and follow the configuration below.
- Create a Calculated column. Name it Regional Leader, and follow the configuration below.
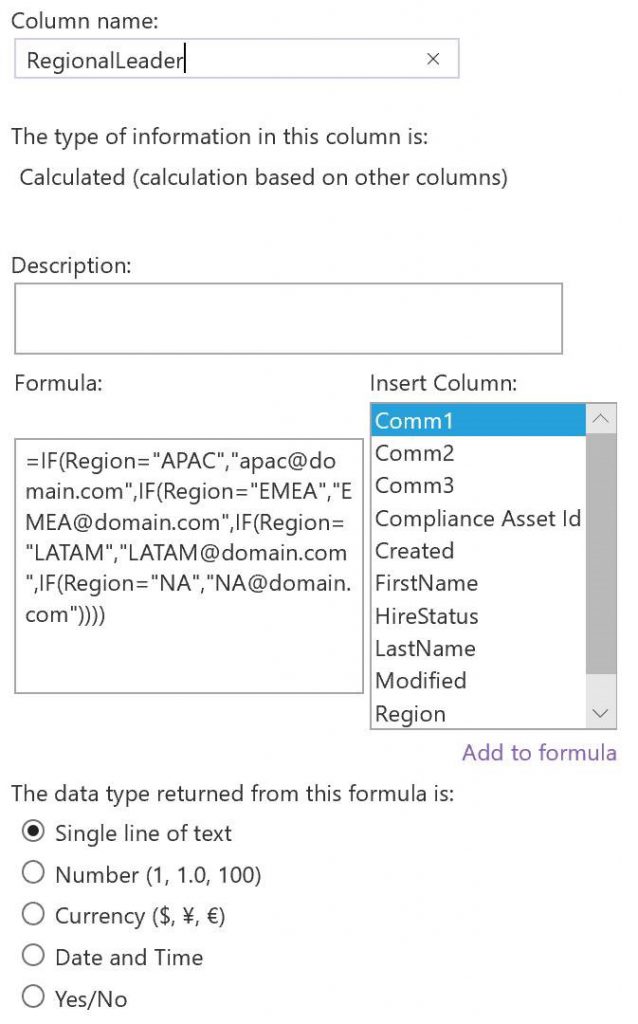
This is one of the columns where we use a calculation. Here is the formula for easy copy and paste:
=IF(Region=”APAC”,”apac@domain.com”,IF(Region=”EMEA”,”EMEA@domain.com”,IF(Region=”LATAM”,”LATAM@domain.com”,IF(Region=”NA”,”NA@domain.com”))))
Once you copy and paste, swap in the regional email addresses applicable to your company. That, we can’t do for you! You could use a regional leader address, but given changes in personnel, you might consider setting up regional shared mailboxes.
- Create a Choice column. Name it Hiring Status, and follow the configuration below. Please note that our options here reflect the messy process of many company hires. They cover situations where a manager or administrator knows someone is hired but does not have a start date, or when a hire gets canceled. If you choose other options, or change the wording, later in this process you will need to update the filter query in the flow action.

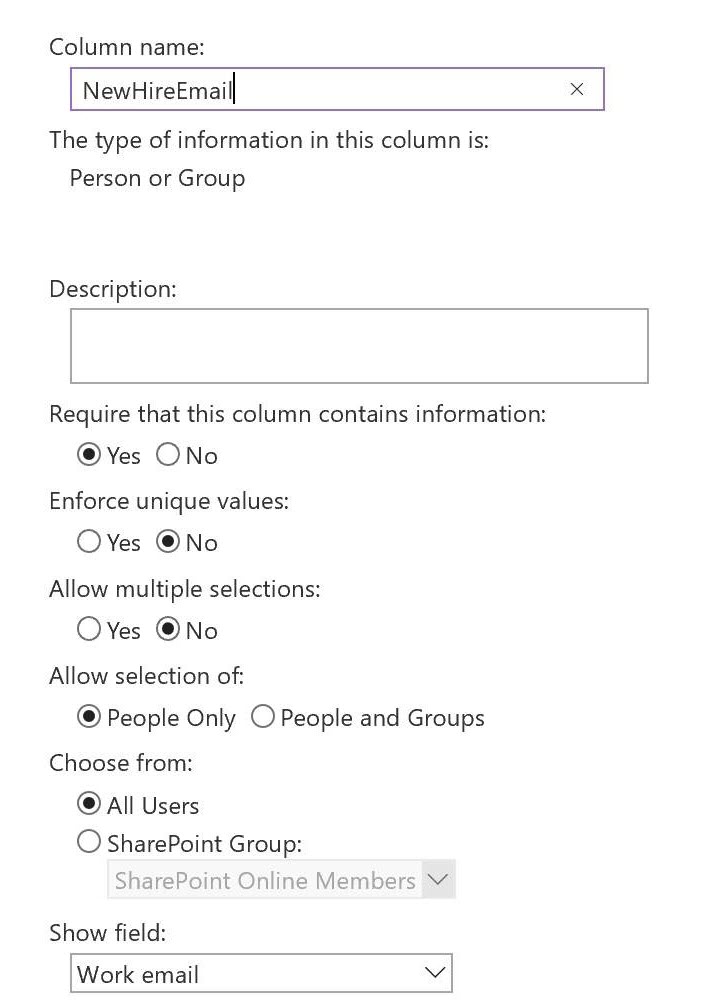
- Create a Person or Group column. Name it New Hire Email, and follow the configuration below.
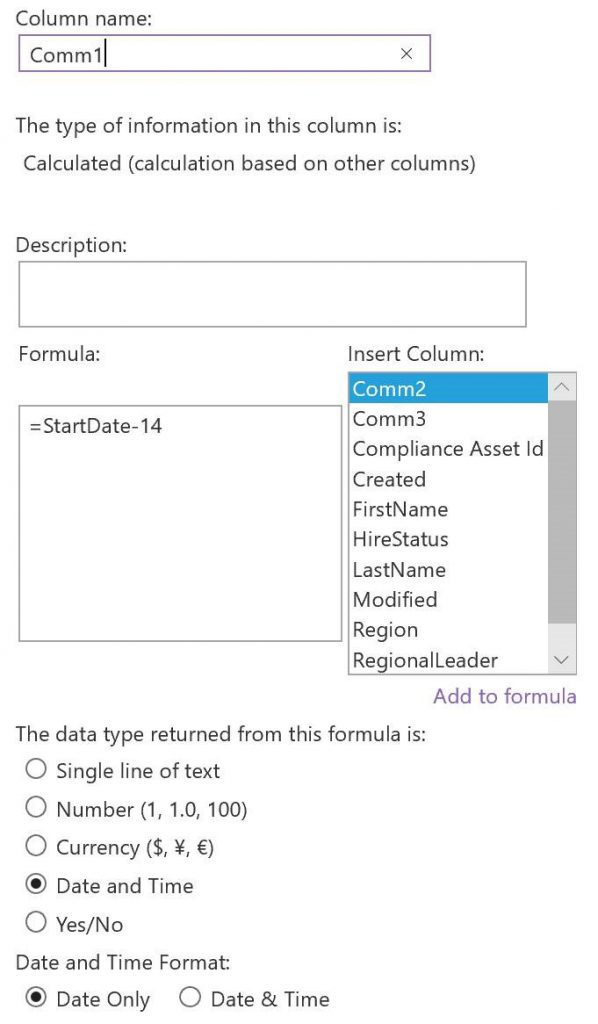
- Create a Calculated column. Name it Comm1, and follow the configuration below. In this case we wanted to calculate the “StartDate minus 14 days,” meaning two weeks before the start date. Why? Because this communication date is intended for managers to receive an email two weeks prior to a new hire starting.
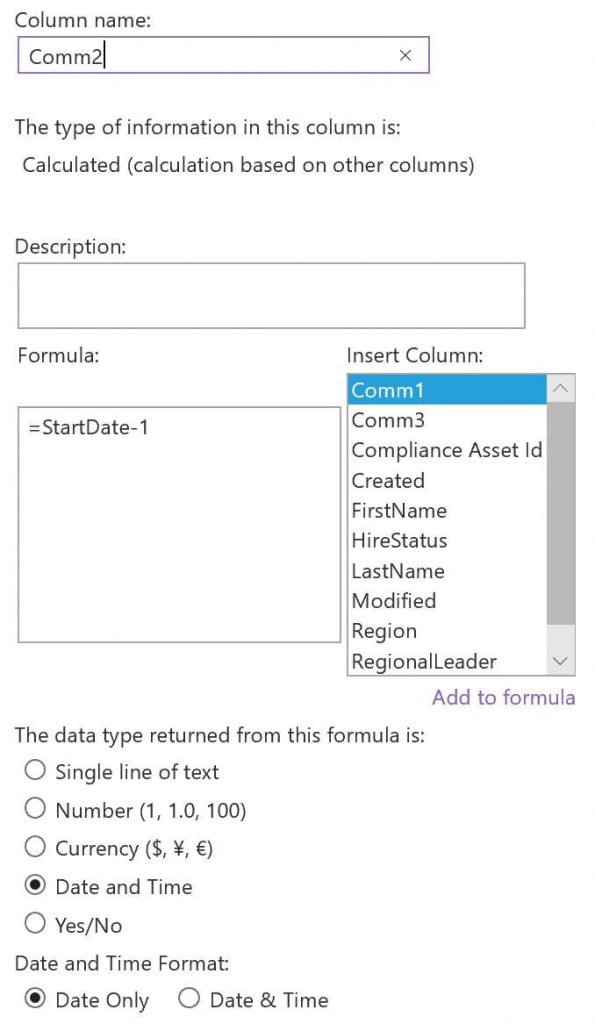
- Create a Calculated column. Name it Comm2 and follow the configuration below. This second communication date will help send managers a notification one day before the new hire starts.
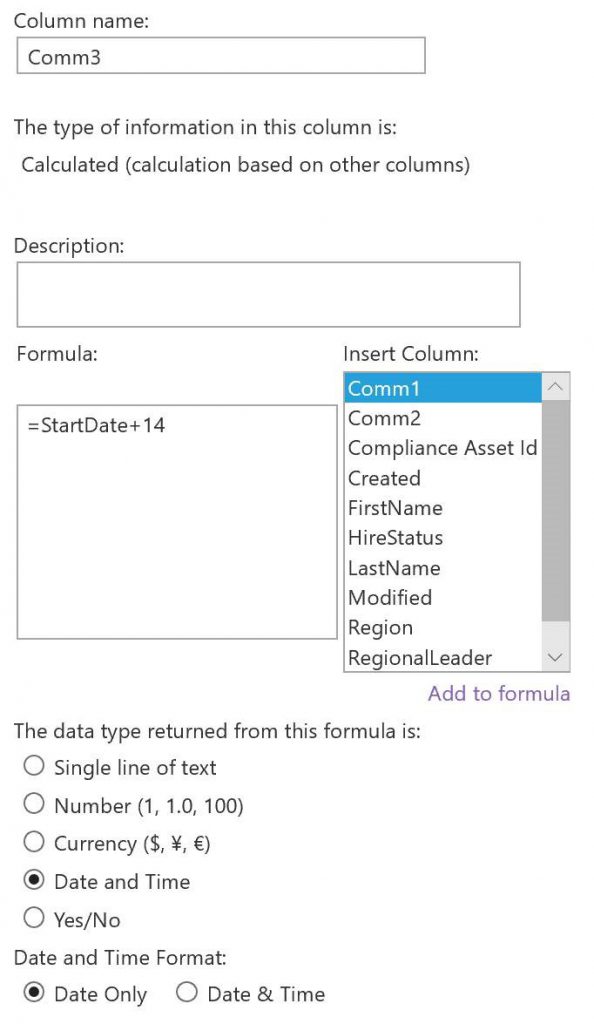
- Create a Calculated column. Name it Comm3, and follow the configuration below, including the provided formula. This communication date is intended for managers to receive an email two weeks (“StartDate+14”) after the new hire starts, to support a check-in and feedback.


Please note that because Comm1 was two weeks before start date, and Comm3 is two weeks after, the 28-day total span is very close to the 30-day storage retention limit of Flow. So, if you want further communications in this onboarding sequence, such as 60-day and 90-day communications, you’ll need another Flow. Yes, Flows can kick off other Flows, but we did not include that here.
With Comm3 done, our SharePoint list is complete!
Step 3: Build the Flows
Now we’ll build four Flows. That’s one each for the cascade requestor, manager, and new hire; and a “bonus” fourth Flow for a welcome message from the geographically appropriate regional leader. Throughout the Flows, we are using the Office 365 Outlook (not the Outlook.com) to send communications.
Flow 1: Cascade Requestor
This first Flow directs a notification to the person creating the onboarding communications request to confirm receipt of their request for the cascade. As this person may be an administrative assistant, the manager of the new hire is copied on the notification.
This is the simplest of the Flows. You can see that the trigger, as shown below, is “When a new item is created” in our SP list. (Remember that in Step 4, we build an input form to collect new requests. That populates our SP list and triggers our Flows.)
For this Flow, we use v2 of the Send Email connector, but we don’t take advantage of its fancy options, as we do in later Flows.
Also, notice in this Flow we’re bringing dynamic content into the body of the email, such as the name of the requestor (“Created By Display Name”).

Flow 2: Manager
Next, our second Flow directs communications to the hiring manager. When triggered, this Flow will deliver three hiring manager notifications:
- The first will arrive two weeks prior to the new hire start date
- The second will show up one day before start date, and
- The third is sent two weeks after the new hire start date.
Remember our SP list? These three communications are based on the time stamps in our three calculated list columns: Comm1, Comm2 and Comm3. That’s why you see three branches in the Flow below.

Of course, our architecture assumes that this onboarding communications cascade is requested more than two weeks before the new hire’s first day. But what happens if someone is hired with less notice, such as 10 days? The good news is that this Flow won’t fail. But, the first of the three messages designed for delivery in this Flow would not take place.
Just like our first Flow, our trigger is tied to changes in our SP list. In this case, we chose “When a new item is created or modified.” Our choice means that this Flow will be triggered when an item is created or modified, and the action that follows will query whether the created or modified list items meet certain conditions.
It’s important to note in Flows with multiple actions: when pulling in dynamic content, the dynamic content pulls from all actions.
This means we need to choose the dynamic content from the SP trigger “When a New Hire is created or modified on the list” output, rather than from the SP action “Get Items if the start date is final” dynamic output. We are using the “When an item is created or modified” trigger, as this triggers an “Apply to Each” for the “Delay Until” action. We need this for the emails to function correctly.
Also important: When we sent this solution out for testing, our friendly expert copied the subject line from the Comm1 email to Comm2 and Comm3. DON’T DO THIS. The flow will not save. They had to delete the entire Apply to Each container to fix it. Additionally, when the “Delay Until” was tested, it didn’t point to the StartDate column directly. To remedy this, our friend formatted with this expression instead: formatDateTime(triggerBody()?[‘StartDate’],’yyyy-MM-ddThh:mm:ssZ’ ) . You can use this as an alternative if you run into the same snag.
Moving on, as you see below, the action “Get items from a SP list” queries our SP list and gets the items where “Hire Status” = “Start Date Final.” (Remember, “Start Date Final” is one of the options available in the “Hire Status” choice column in our SP list.)
So, when the start date is finalized for a new hire, then (and only then), the manager of that hire will receive the three communications.

Now take a closer look at the three branched communications in this Flow. They all use a “Delay until” action that is waiting for a date from our SP list (more dynamic content!) to send the communication.

Also, these three communications use the Send Email v2 action. We chose that option because, unlike the classic Send Email, the v2 option enables rich text editing. This feature will make your communication draft author happy!
Just as in the first Flow, the messages created here will use dynamic content pulled from our SP list. The subject line of these emails will reflect the name of the new hire and their start date.

You’ll see in this Flow that the body text for each of these manager communications is just a placeholder. You could house this body copy in a second SharePoint list and pull it dynamically into the appropriate messages. Why not?
Flow 3: New Hire
Now let’s move on to the third Flow, which sends two communications to the new hire, with one on the hire date and one a week later. Of course, you can customize the timeframe of these communications, within the 30-day run limit of a Flow.
As you see below, just like the Flow that sent messages to managers, the trigger here is “When a new item is created or modified,” and there is a following action to query our SP list and get the items where “Hire Status” = “Start Date Final.”
Beneath that action are the two branches that drive the two new hire communications:
- The first will arrive on the hire’s start date, and
- The second will show up a week after the start date.

Let’s focus for a moment on the purple variable input step in this Flow. Here, we decided to use Flow rather than SharePoint to set the date of our new hire communications. We’re using a variable input to add 7 days to the start date, with this expression: addDays(triggerBody()?[‘StartDate’],7,’MM/dd/yyyy’)

In this view, and many others, we’ve renamed our triggers and actions to help keep track of our workflow. This can be a helpful practice when Flow admin rights are shared across several people, as we’ll note later.
Looking at the two communication branches in the new hire Flow, the first branch uses the time stamp Start Date directly from the dynamic content in our SP list. But the second branch uses the time stamp based on the output of the variable, which sends our new hire a message a week after they start work.
Both communication branches in this Flow use Send Email v2 to enable rich text editing. Also, both messages generated here make use of dynamic content from the SP list to populate the new hire’s email address, and a personalized greeting in the email subject line.
Flow 4: Bonus: Regional Leader Welcomes New Hire
Now we’re ready to move on to our last, optional (unverified but fabulous) “bonus” Flow, which sends the new hire a welcome message from the geographically appropriate regional leader.

By now you’re familiar with the trigger and first action in the Flow shown above, which fires when an item in our SP list is added or modified, and drives action when a condition is met (“Hire Status” = “Start Date Final”). Specifically, the action sends a communication on the timestamp of the new hire start date.
That communication uses the classic Send Email action, because it offers an advanced options field called “From (Send as).” This feature enables us to send a welcome message to a new hire on behalf of a regional leader, as long as we take care of Outlook mailbox access permissions.
Please note, you may or may not see this action as available in your tenant! If not, this Flow will not work for you, but the good news is your tenant isn’t broken. If the Send Email classic action is not there, you will know it has been deprecated, as Microsoft notified us it would be, back in August, 2019.
However, if you see it, feel free to use it, because as that deprecation notice promises, Microsoft is committed to your Flows continuing to work even as they routinely upgrade actions and connectors.
So, is the action there or not? If it is, great! If not, all is not lost, as we have another option for you. The picture below shows the same Flow, but with one change: we have chosen the Send an Email from a Shared Mailbox v2 action instead.

So far we’ve presented you with a fairly straightforward technological choice. But as we’ll talk about below, this Flow has interesting challenges in terms of people and process, including mailbox permissions or setting up shared mailboxes.
Remember that in our SP list, we created a choice column with options for each region. That enables our SP input form to drive a regional selection. The choice of region then interacts with a calculated column from our SP list, to produce the correct regional leader’s email address in the “From (Send as)” field.
These Flow clicks are quick, but the Outlook access steps to enable “(Send as)” may take time for four leaders. We’ve brainstormed solutions including:
- Setting up regional shared mailboxes
- Partnering with administrative assistants who have leaders’ Outlook delegation rights
- Making administrative assistants with leaders’ Outlook delegation rights owners of this Flow
We also thought about service accounts in this context. If your organization uses them, service accounts would offer at least three benefits here, among others:
- Your leader or administrative assistant with delegation rights might be more comfortable with the idea that a service account shares those rights. All logins to the shared account would be trackable.
- Your Flow would not be deleted when you or any other individual owner left the company.
- If your company has limited Flow licenses, a service account may make the best use of resources.
In all these cases, we will need to make future adjustments as our company structure or leaders or administrative assistants change.
We hope you can understand why we love this Flow, challenging as it may be. It’s loaded with dynamic information from our SP list, including not only the appropriate regional leader as sender, but also the region in the email subject line, the new hire’s name in the message body, and the manager copied on the message.
If you put it to work, even in a scaled-down version for smaller departments, please let us know!
Step 4: Create an Input Form with SharePoint
As many of us are familiar with creating useful and appealing forms with SharePoint, we won’t walk through the setup mechanics here. Note that all fields in this form are required in order to update our SP list, power our Flows, and send our onboarding communications.

At this stage in the process, Melanie looked at our form and noted that the two-word field labels (like “FirstName”) are “squished together.” Michelle responded that she could update the column headers in the SP list to make them “un-squished” in the SP form.
The interesting learning here is that our Flows will be fine even with Michelle’s changes! This is because the Flows refer to the originally created column header names, even when those names are changed later. A fresh Flow run confirmed it.
Melanie promptly suggested another change, as business partners do. If form labels can be renamed, she’d change “First Name” to “New Hire First Name,” to avoid user confusion.
So, the essential points to remember here are about people and process. First, host the form where everyone who needs it can access it. Second, integrate the form into any other pages that administrative assistants or managers use when setting up new employees.
Third, provide training for all “request creators,” so they’ll know what this form offers and delivers. Why training, or at least guidance in context on the page? Well, consider how much activity is powered by the “Hire Status” choice of “Start Date Final.” You’ll want people to choose “Start Date Final” only when it’s final-final!
Plus, you may want to explain the ability to update and even cancel the communications cascade using the “Hire Status” options.
Step 5: Manage Your Flows
All throughout our demonstrated Flows, you’ve seen it: renamed triggers and actions that are there to help us remember later “what on earth we were trying to do when we made this.”
Renaming the elements in your Flow is helpful not only for you, but other owners. You did plan to name other Flow owners, right? Because if you leave a company, and you’re the only owner of one or more Flows, those helpful Flows will disappear along with you. Remember what we said above about the virtues of service accounts!
Plus, let’s think about failures for a moment. It’s good to keep an eye on your Flow runs every now and then, where you can see the history of their success or failure, and whether your Flow is being used at all. (If not, that’s another kind of failure.) You might consider adding error handling to your Flows, so if they fail, you get proactive notification.
Also, monitor the Flow roadmap, because actions and connectors continue to evolve. After all, the Send Email v2 action that we rely on here is still new enough that it carries “(Preview)” notation.
Make It Your Own, and Share It
As we noted in the very first step of this process, there are many possible configurations that could support automated onboarding communications, mixing SP and Flow and maybe even Forms. Your solution may be different and fabulous in its own way.
Creativity and community fuel the joy that powers our solutions. Thanks for coming along!