An advanced flow: Processing Résumé Submissions


Today, we wanted to highlight some of the advanced capabilities for Microsoft Flow through a real world example: the résumé screening process used by the Microsoft Flow engineering team. The three advanced capabilities we are going to focus on are:
- Approval steps
- Conditional branching
- Chaining several actions together
This same Flow was also featured in the “Integrations Made Simple” session at the Integrate conference in London (video available).
The Problem
We are trying to aggressively grow the Microsoft Flow engineering team, and as a result have many different job postings (internal and external to Microsoft). The résumé submission system Microsoft uses generates an automated e-mail to the hiring manager of the prospective team whenever a candidate submits a résumé.
Before Microsoft Flow, the hiring manager (me) would have to manually shepherd the résumé through a few different steps:
- Review the résumé contents to see if the candidate has the relevant experience and would qualify for the role.
- If the candidate were interesting:
- Send them an e-mail that would:
- provide additional information / links about the position and team;
- introduce them to the engineering manager on the team; and,
- offer to set up a 1-hour technical screening phone call in the next few days.
- Add an item to my Wunderlist to keep track & mark as “complete” when we finish the tech screen.
- Send them an e-mail that would:
- If the candidate were not interesting, send them an e-mail that would let them know that we did not think the fit was right and offer to stay in touch in the future.
- After the above completes, delete the associated e-mails to keep my inbox clean.
Across our open positions, we get several résumé submissions every day, seven days a week. Completing the above was tiresome (e.g. having the right text for setting up the tech screen, including the right people on the e-mails, etc.) and error prone / easy to lose track of a great candidate. So, we set out to solve it with Microsoft Flow.
The Solution
In order to solve this problem with flow, we needed to map the above steps into flow concepts. In particular, it would require an approval step to decide whether or not we want to “screen” the candidate. Then, using the result of that approval step, we would leverage conditional branching to run different actions depending on if we want to screen the candidate or not.
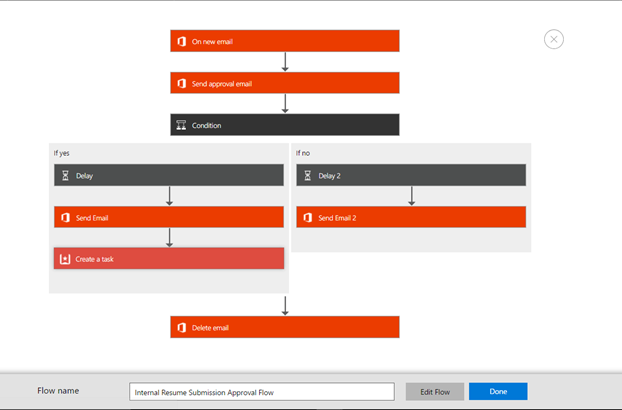
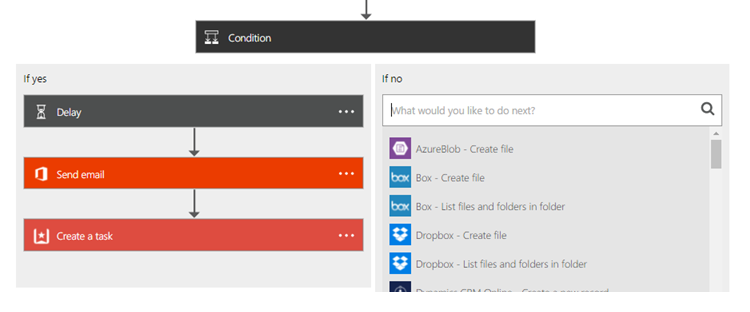
Before diving into the details for each individual step, let’s check out a sneak peek at the finished flow (with nine different steps across three services!):
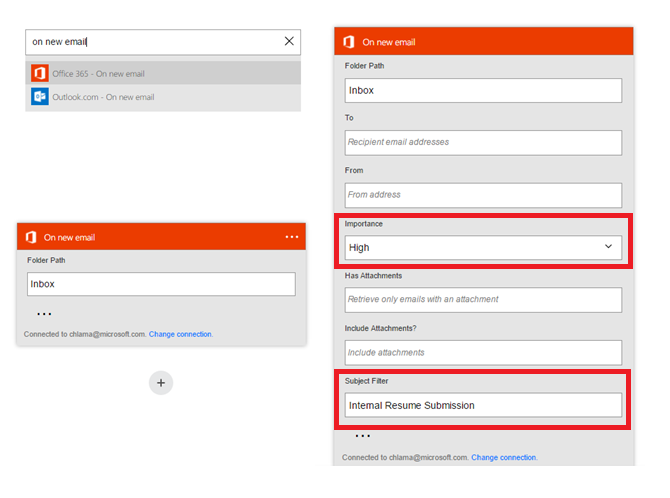
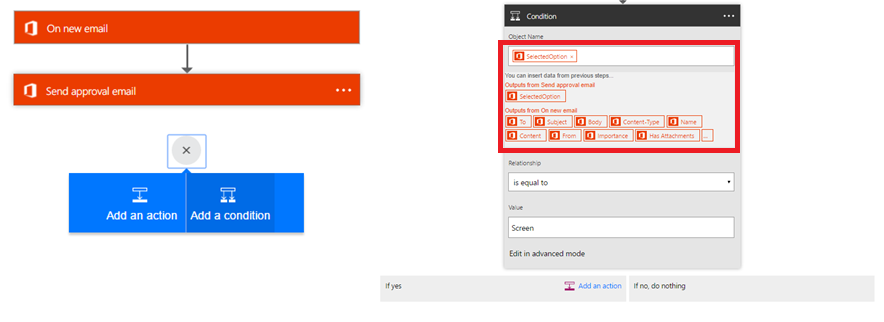
The first step or “trigger” is based on when I receive an e-mail from the automated résumé submission system inside of Microsoft. This automated e-mail has a particular Subject line (i.e. starts with “Internal Resume Submission”) and is always marked as High Importance, so I add those filters:
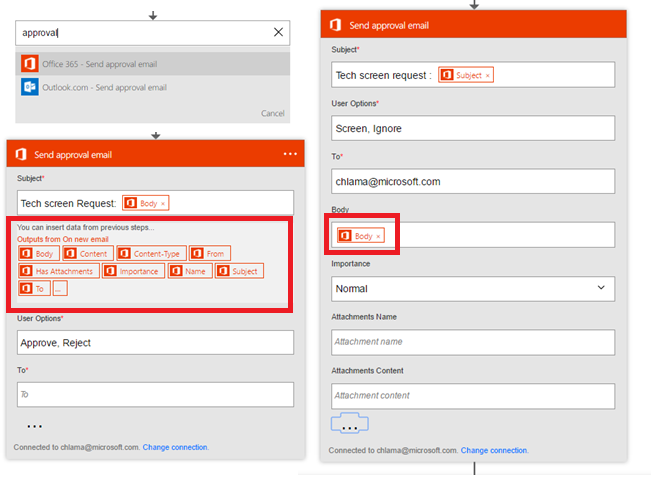
The next step or “action” is to send myself an approval e-mail. The approval e-mail allows me to specify two different options (I chose “Screen” and “Ignore”) in the e-mail. I can also include text / content inside the approval e-mail, so I pass the résumé details in so I can easily review. We can see that in the visual designer below:
Below is an example of what the approval e-mail looks like (blanking out the candidate name + résumé details):
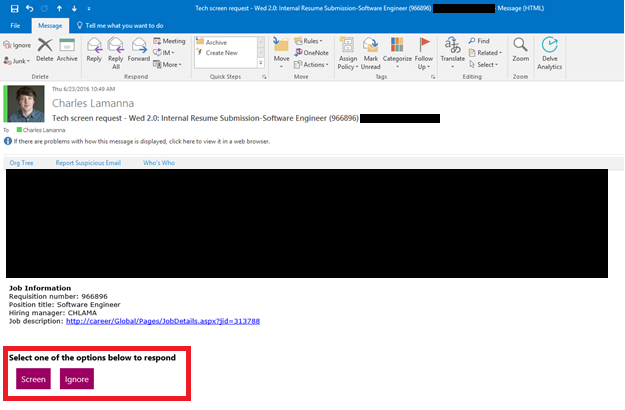
You can see "Screen" and "Ignore" as buttons appearing inside the e-mail. If I click the "Screen" button, the candidate should advance to the next step in the process and start a tech screen. If I click on the "Ignore" button, we would send the candidate our regrets. These buttons work in Outlook, my iPhone or in OWA.
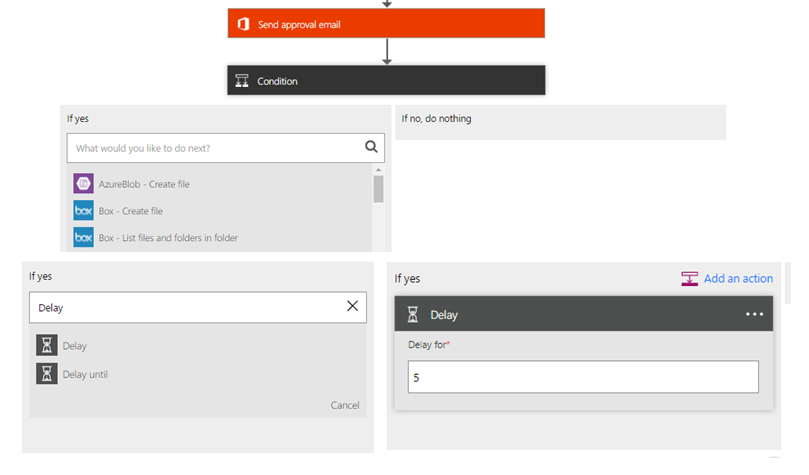
After the approval step (which can take a long to complete – maybe a few days if I am behind on e-mail), we need to fork the flow based on the response of "Screen" or "Ignore." To do this we configure a “condition” in the flow. The condition will allow us to run one set of actions if it is “Screen”, and another set of actions for “Ignore.”
Inside the “If yes” set of actions, we want to run a few different steps to screen the candidate. They are:
- Delay five minutes after approval – we don’t want to make it feel like an automatic reply.
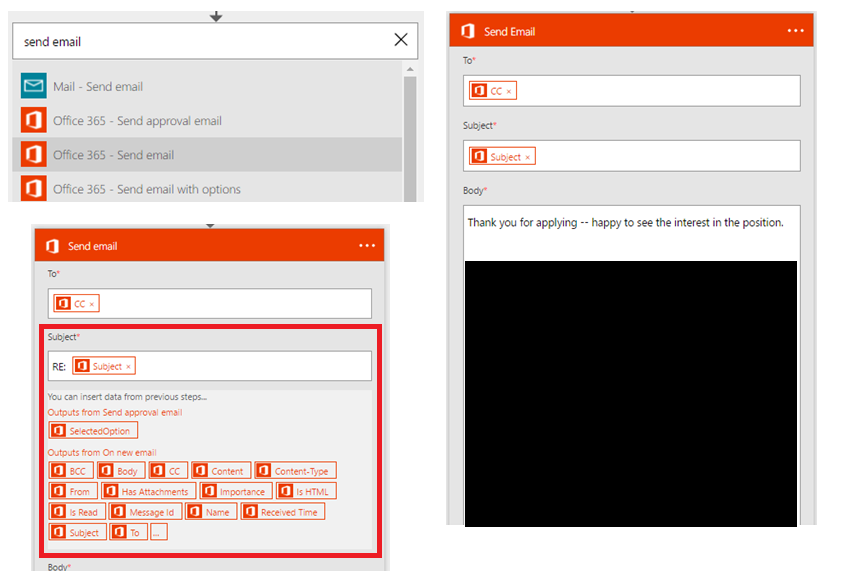
- Send an e-mail from my work e-mail (chlama@microsoft.com) that would:
- provide additional information / links about the position and team;
- introduce them to the engineering manager on the team; and,
- offer sometimes to set up a 1-hour screening phone call in the next few days.
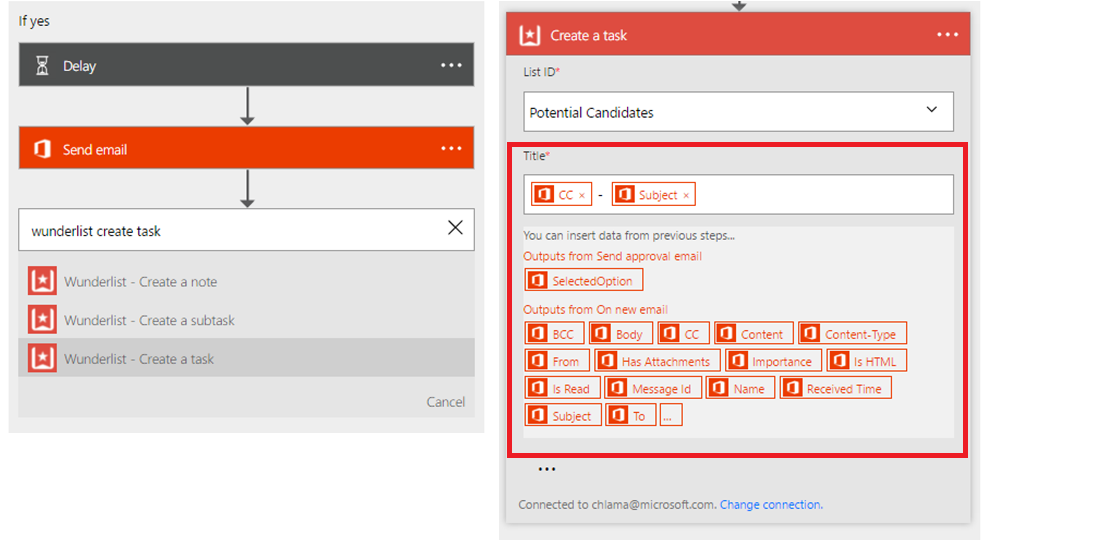
- Add an item to my Wunderlist (list called “Potential Candidates”) to keep track & mark as “complete” when we finish the tech screen.
A walkthrough via pictures can be seen below:
a. Delay five minutes after approval – we don’t want to make it feel like an automatic reply:
b. Send an e-mail from my work e-mail (chlama@microsoft.com) that explains the position & introduces the engineering managers:
c. Add an item to my Wunderlist (list called “Potential Candidates”) to keep track & mark as “complete” when we finish the tech screen.
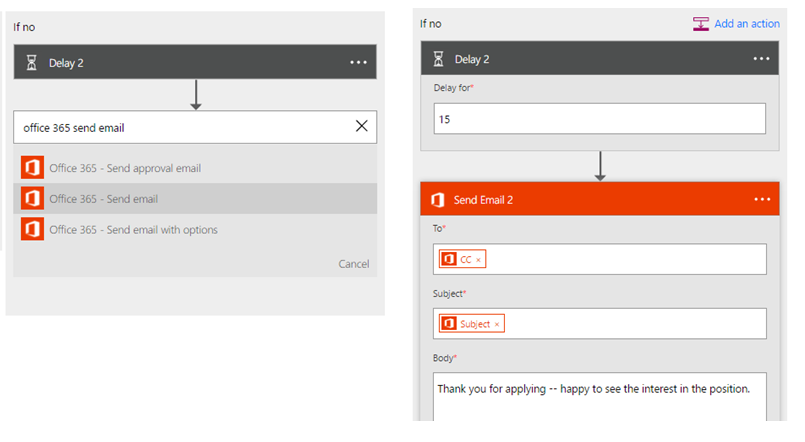
However, if we chose not to screen the candidate (by clicking the “Ignore” button in the approval e-mail), we want to run a different set of actions. We do this by adding steps to the “If no” section:
In this case, we want to have a slight delay (to make it not feel so automated) and then send our regrets to the candidate. We also use values from earlier steps (e.g. their e-mail address / name) to make the e-mail feel more personal – after all, we reviewed their résumé carefully before deciding not to offer a tech screen. For brevity, the steps here are condensed:
As the last step of the entire Flow, we want to delete the original résumé submission e-mail to avoid cluttering my inbox. We want to run it after either the “condition” completes, regardless of it being an approval or a rejection. As a result, we add it at the very end of the Flow (and reference the message Id from the original “On new email” trigger):

After completing all those steps, we end up with the final Flow, which has been happily running for a few months now:
If you're interested in seeing this completed flow for yourself check out this template (which has the Microsoft-specific details removed):
Summary
In the end, after adding all the steps (which takes just a few minutes once you are familiar with the Flow concepts of actions & triggers), we were able to automate a common process on the Flow team. As a rough estimate, this automation saves me 10-15 minutes every morning.
Additionally, as part of walking through this Flow, we were able to highlight some of the advanced capabilities of Microsoft Flow:
- Approval steps
- Conditional branching
- Chaining several actions together
Lastly, if you are a dev and would like to work on Flow, please reach out. We are hiring!